How to Size Azure VMware Solution Nodes for Migration
More and more customers are requesting to explore Azure VMware Solution as the target for migration hence I thought about addressing one of the most common and first problem of many architects and pre-sales folks. How to size Azure VMware Solution nodes? Before diving into the network design and components involved in the AVS design. Most of the time, customers need to determine how many nodes are required to fit their on-premises workload and how much the cost of those nodes is.
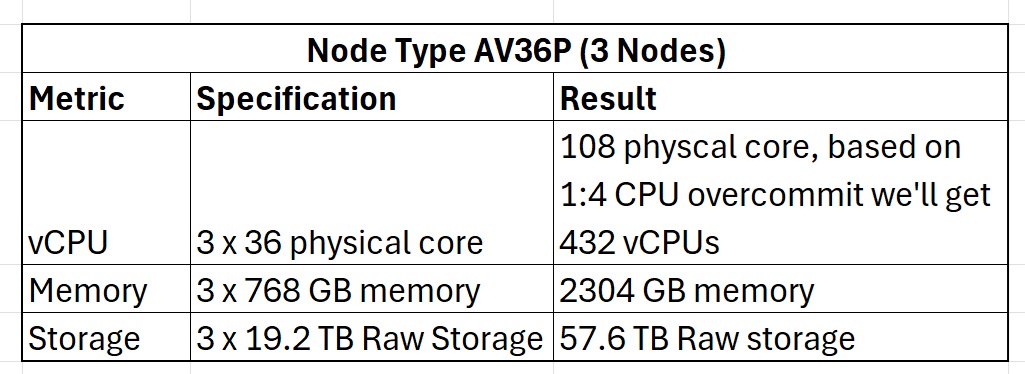
Why are we focusing on vCPU, memory, and storage throughout this blog? Because AVS nodes come in specific size, For example, one node of AV36p has 36 physical cores, 768 GB memory, and 19.20 TB NVMe storage. You’ll need to find out how many nodes you’ll need for your deployment. And based on that you’ll keep on adding nodes.
Specifications of multiple node types are mentioned here
https://learn.microsoft.com/en-us/azure/azure-vmware/introduction#hosts-clusters-and-private-clouds
To size AVS nodes, there are two main methods:
Manual Method: This method mainly involves sizing AVS nodes based on the number of vCPUs, memory, and storage in use. So basically, based on the current size of VMware cluster you’ll be sizing the AVS nodes. This can also be budgetary sizing because if your VM has 16 vCPUs but utilizes only 4, we still consider 16 vCPUs in our overall sizing of AVS nodes and not the actual utilization.
Azure Migrate Method: In this method you’ll be using tools like Azure Migrate to calculate the utilization of VMs based on average or peak load and basis on that it’ll help you size AVS Nodes accurately. This will be the right size because, even though you’ve configured 16 vCPUs for a VM but utilize only 4, you consider only 4 vCPUs. Hence your sizing is accurate and right sizing. Another method available is the RVTools import-based assessment. This is as-is based sizing just like what you achieve in manual method. It’s just that this is more UI centric and no manual calculations are involved.
Cons associated to appliance-based method, you require time to run the tools and capture performance metrics over a period of time. If you want immediate sizing of an AVS node or need a budgetary quote, then you can go with as-is based sizing.
Let’s start with as-is sizing with Manual Method, and to capture vCPU, Memory and Storage utilization of all the VMs in your VMware landscape, RVTools stands out as the ideal tool.
Manual Method
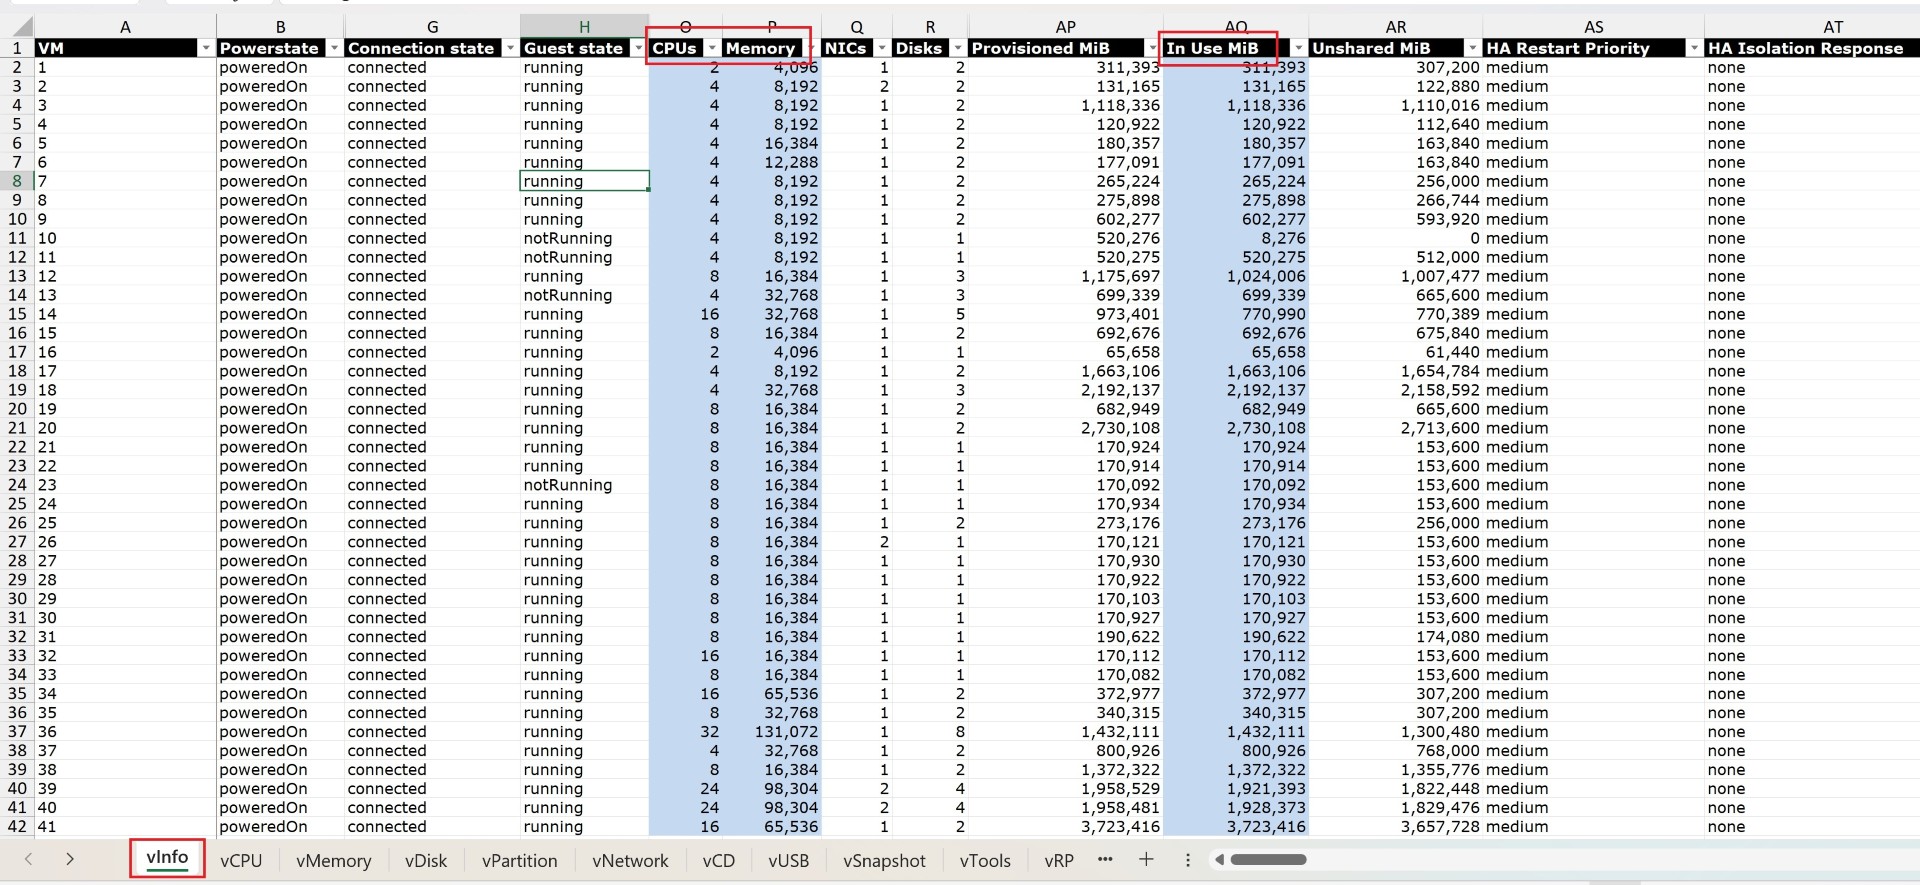
Most VMware admins would know how to export a VMware cluster via RVTools, if not then you can download the tool from website https://www.robware.net/home You’ll find multiple tabs, including ‘vminfo,’ which contains the necessary details. Sum up the relevant numbers from this tab.
- CPUs: this shows the vCPU associated with the VMs
- Memory: This will contain the memory allocated.
- In-use-MiB: This shows the current utilized storage
- Provisioned MiB: This contains the allocated storage. We’ll not be considering this column, as the storage can be expanded based on the requirement with help of external storage hence, we’ll only consider In-use-MiB.
AVS Node Sizing:
Once we get the total vCPU, Memory and Storage-In-use we’ll need to compare this with what Azure nodes can provide. Let’s take an example. 3 Nodes of AVS nodes (Minimum) will provide below size. Based on your CPU and memory requirements, you’ll need to size your deployment accordingly. Storage consideration is slightly different, and we’ll dive deeper into how to calculate usable space from your nodes in the next section. However, you have to mainly consider vCPU and Memory while sizing the nodes the reason being you can expand the storage with help of remote storage option like Azure NetApp files, or Azure Elastic SAN. In this scenario you don’t have to expand the node count just to fit your storage needs.
Now based on the rvtools size you can get the total vCPU, Memory and storage you need and then size the number of AVS nodes according to your requirement.
Storage Sizing:
we get RAW storage from AVS nodes, and usable space will depend upon multiple factors mentioned below.
- Which RAID you choose while creating VM Storage policy (RAID 1, 5 or 6)
- FTT you select during storage policy (FTT 1 , 2 , and 3)
- Slack Space available (you’ll need at least 25% free space to get SLA)
- Checksum (average of 5%)
- Space efficiency ratio (1.50 – on average, however it depends upon your data which is getting stored and how much space efficiency you get. It can increase as well) If you want to know more about storage and consideration in AVS then you can refer my previous blog around this topic.
https://www.azuredoctor.com/posts/Demystifying-Storage-types-in-AVS/
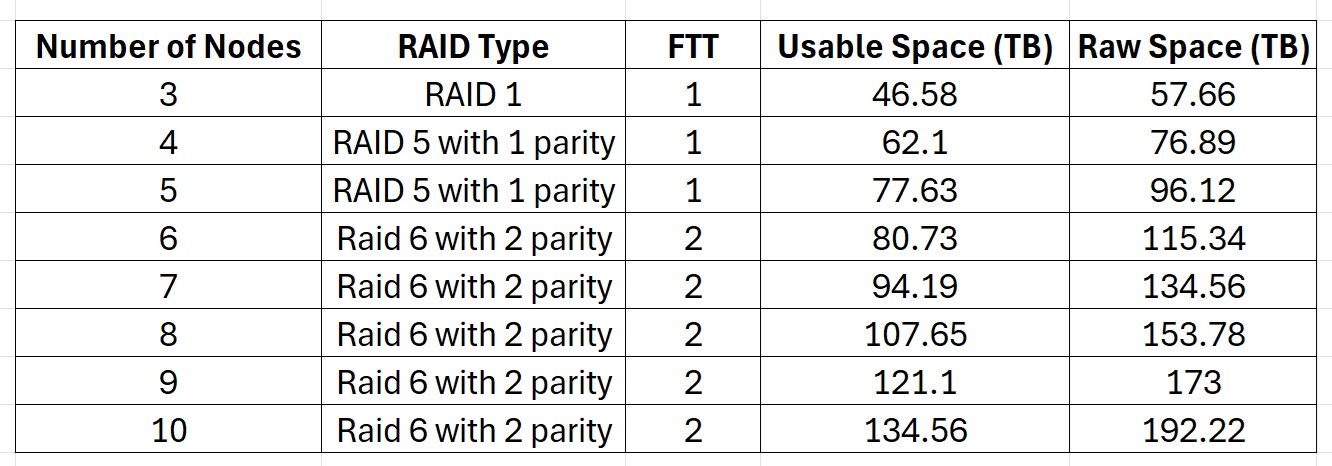
Because of the above-mentioned factors your usable space would differ. For quick calculation purposes I’ve captured the RAID sizing below for AV36P which provides us with the most usable storage. If you want to increase FTT from 2 to 3 then the usable storage would be less but will provide higher resiliency. Based on the SLA of AVS, if you have 6 or more nodes, you’ll need to opt for a minimum of FTT 2.
Considerations: -
- Checksum: 5%
- Slack Space: 25%
- Space Efficiency in Ratio: 1.50
Example of Sizing
Let’s take one example of how you would get AVS Node count. After rvtool you found you need 500 vCPU and 3.5 TB memory, along with that you need 90 TB usable storage. We’ll consider AV36p SKU for AVS sizing. Along with that we’ll be considering CPU overcommit of 1:4. So, in order to fit 500 vCPU with 1:4 overcommit you’ll need 4 Nodes, 36 x 4 = 144 Physical core, 144 x 4 = 576 vCPU. However, with 4 Nodes of AVS AV36p you’ll only get 768 x 4 = 3072 GB of memory. So, you’ll need one extra node to fit your 3.5 TB of memory so you’ll need total of 5 AV36p nodes, because memory is a bottleneck in choosing 4 nodes. With 5 AVS node you’ll receive only max 77.6 TB of usable storage hence you can get extra Storage from ANF or ESAN. So external storage you’ll need to factor in your sizing would be 12.37 TB. Here you go. 5 AV36p node you’ll need for overall migration.
However as this is just as-is sizing, and based on the CPU generation and NVMe storage your actual requirements can decrease. Basically, during the deployment you’ll start with minimum cluster deployment of 3 Node and start increasing the node count when you migrate the VMs and need higher memory and vCPU.
Azure Migrate based sizing
Above sizing we had done using manual method, This can be sized in a more automated way with Azure Migrate. Even though you’re doing it through Azure Migrate, the metrics and parameters for storage sizing and CPU overcommit remain the same. There are two main types of AVS sizing which can be accomplished with Azure Migrate.
- Appliance Based: Installing azure migrate appliance and exporting the sizing based on performance assessment or as-is
- Import Based: If you’ve rvtools export then the excel file can also be imported in Azure Migrate project which provides us with as-is based sizing.
Appliance Based
Let’s talk about the first option, this is very similar to the process used when the target was an Azure VM. i.e installing Azure Migrate appliance, adding vCenter server details and let it collect performance history of VMs. The only change would be here is, instead of creating Azure VM based assessment report you’ll have to select AVS assessment and then provide the parameters for sizing. In this you can do performance based assessment which will check vCPU, Memory performance of VMs and then provide you with recommendations of AVS Node. If you want as-is then it can also do that and provide you with AVS node count based on current vCPU and Memory of VMs.
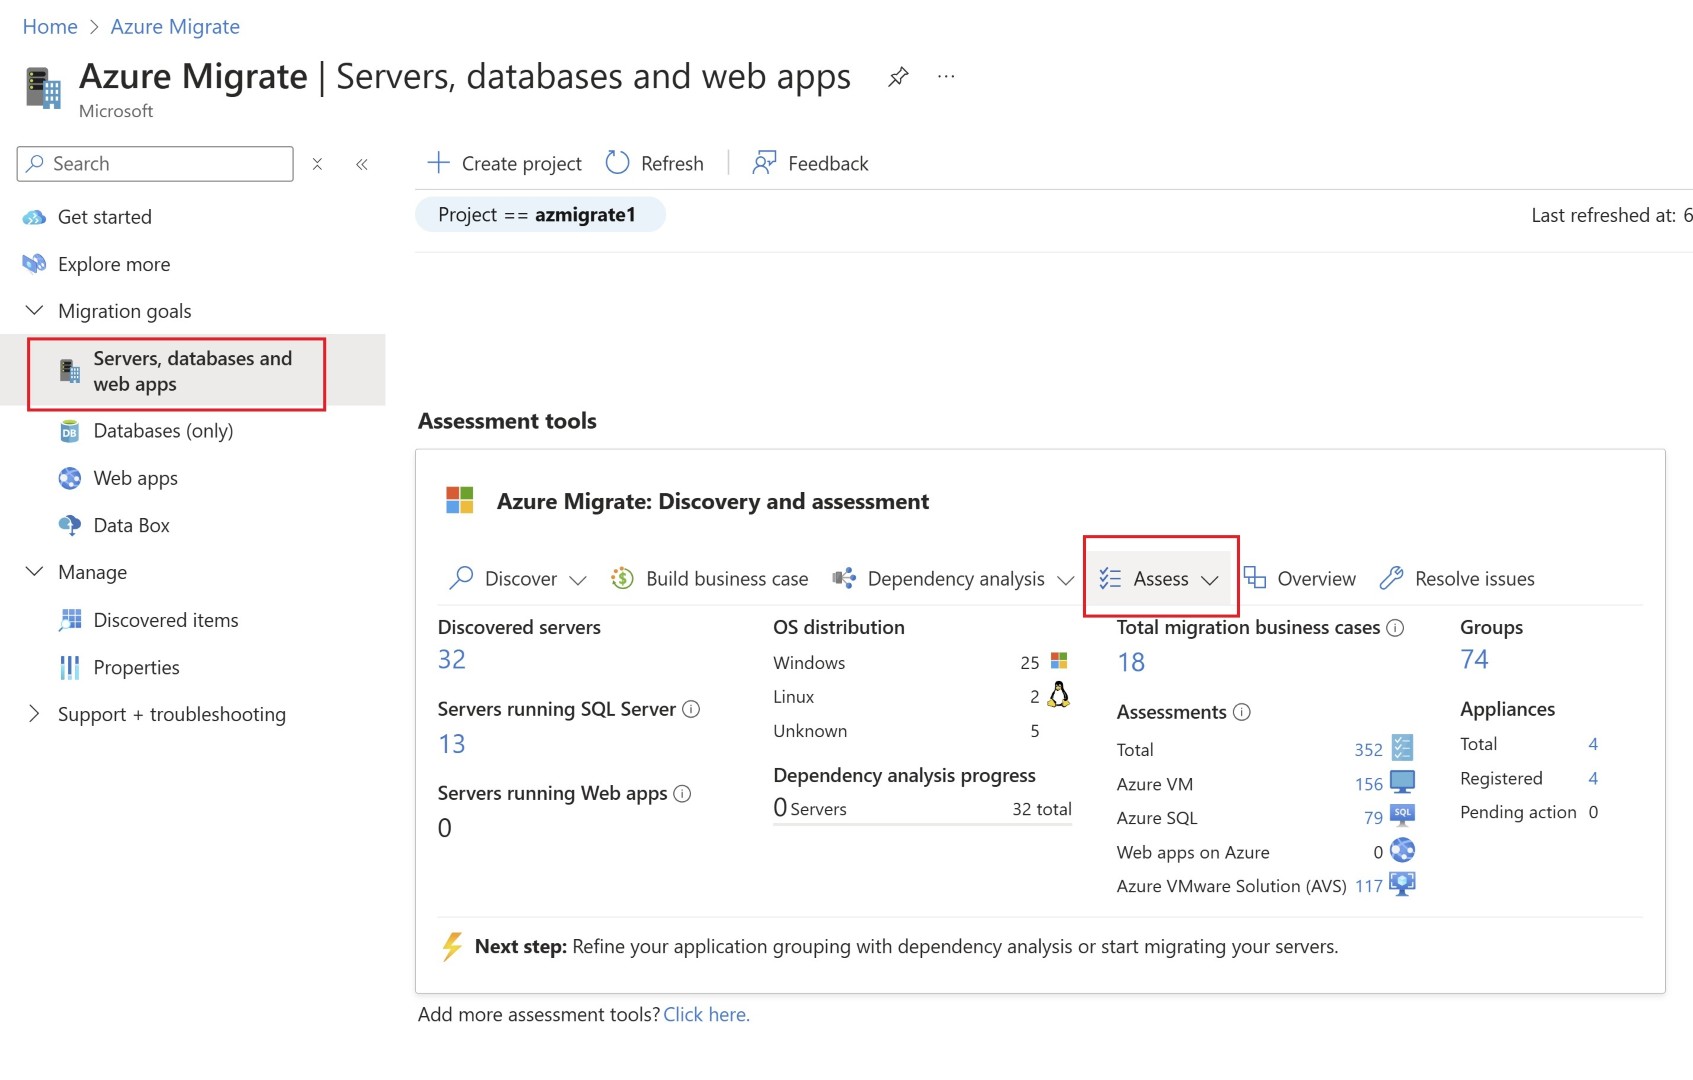
Assuming you’ve discovered all the servers using azure migrate based appliance, we’ll jump into how to create the assessment.
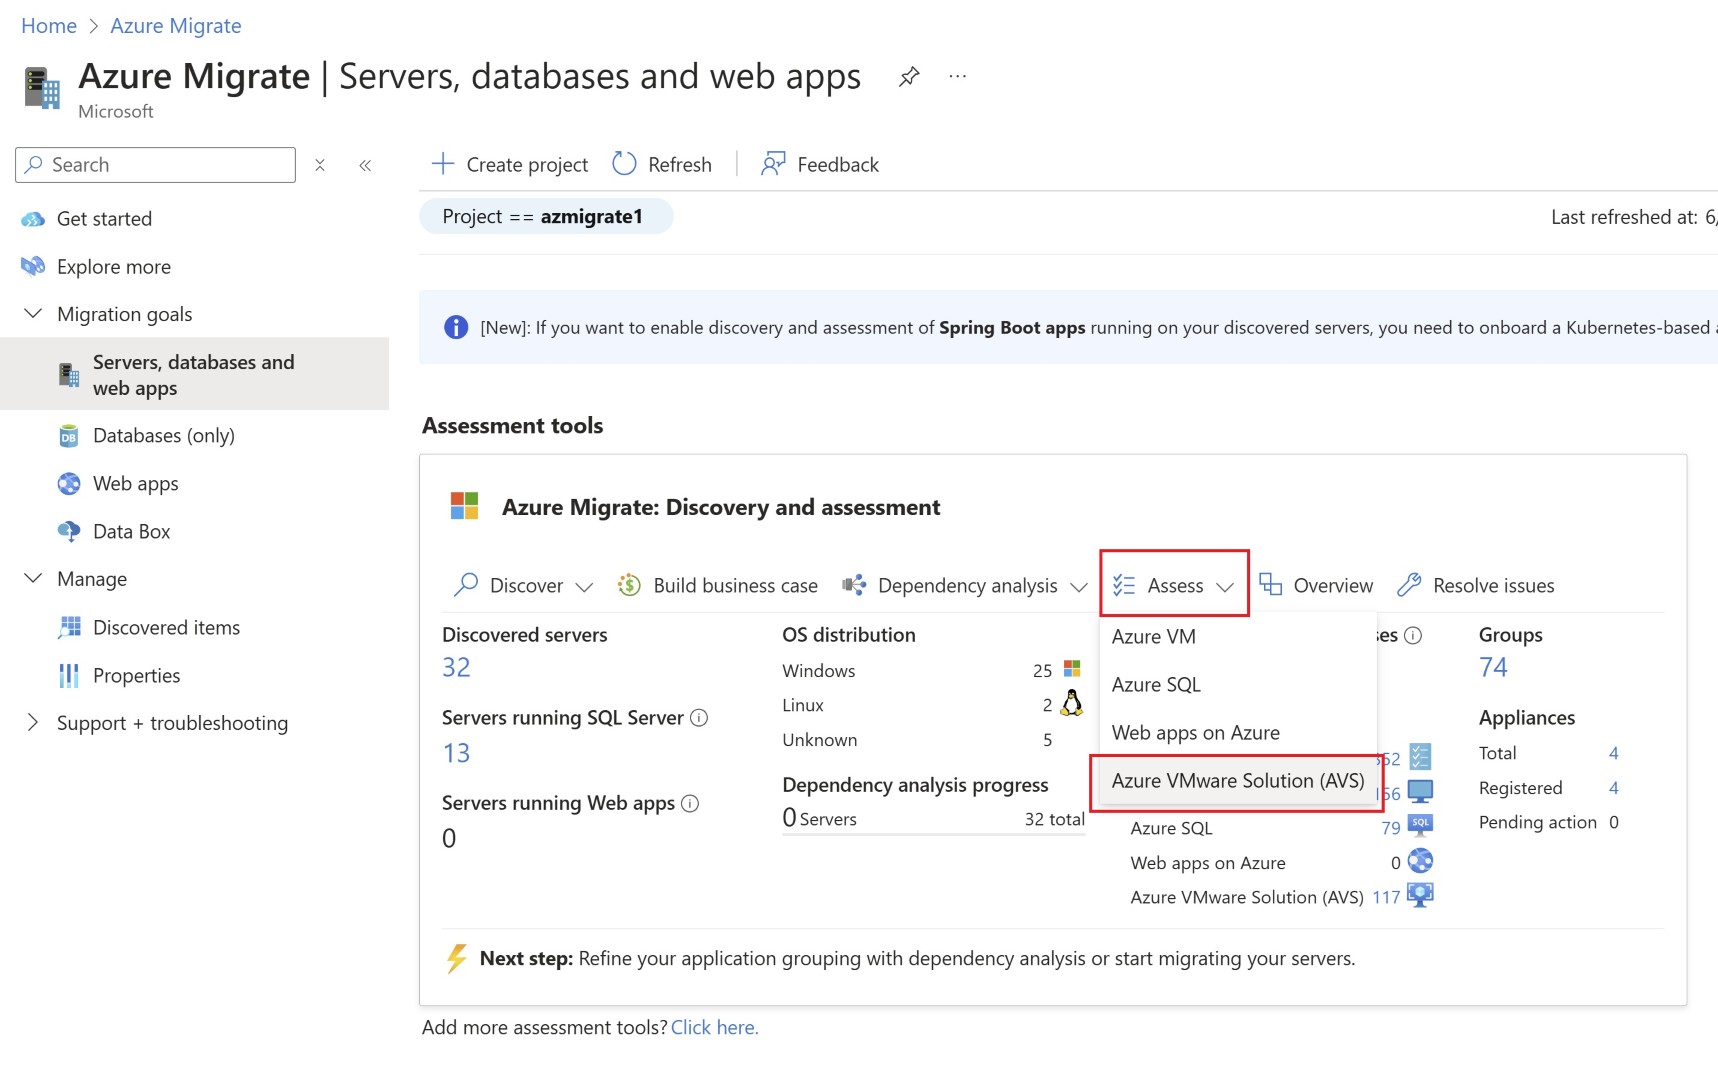
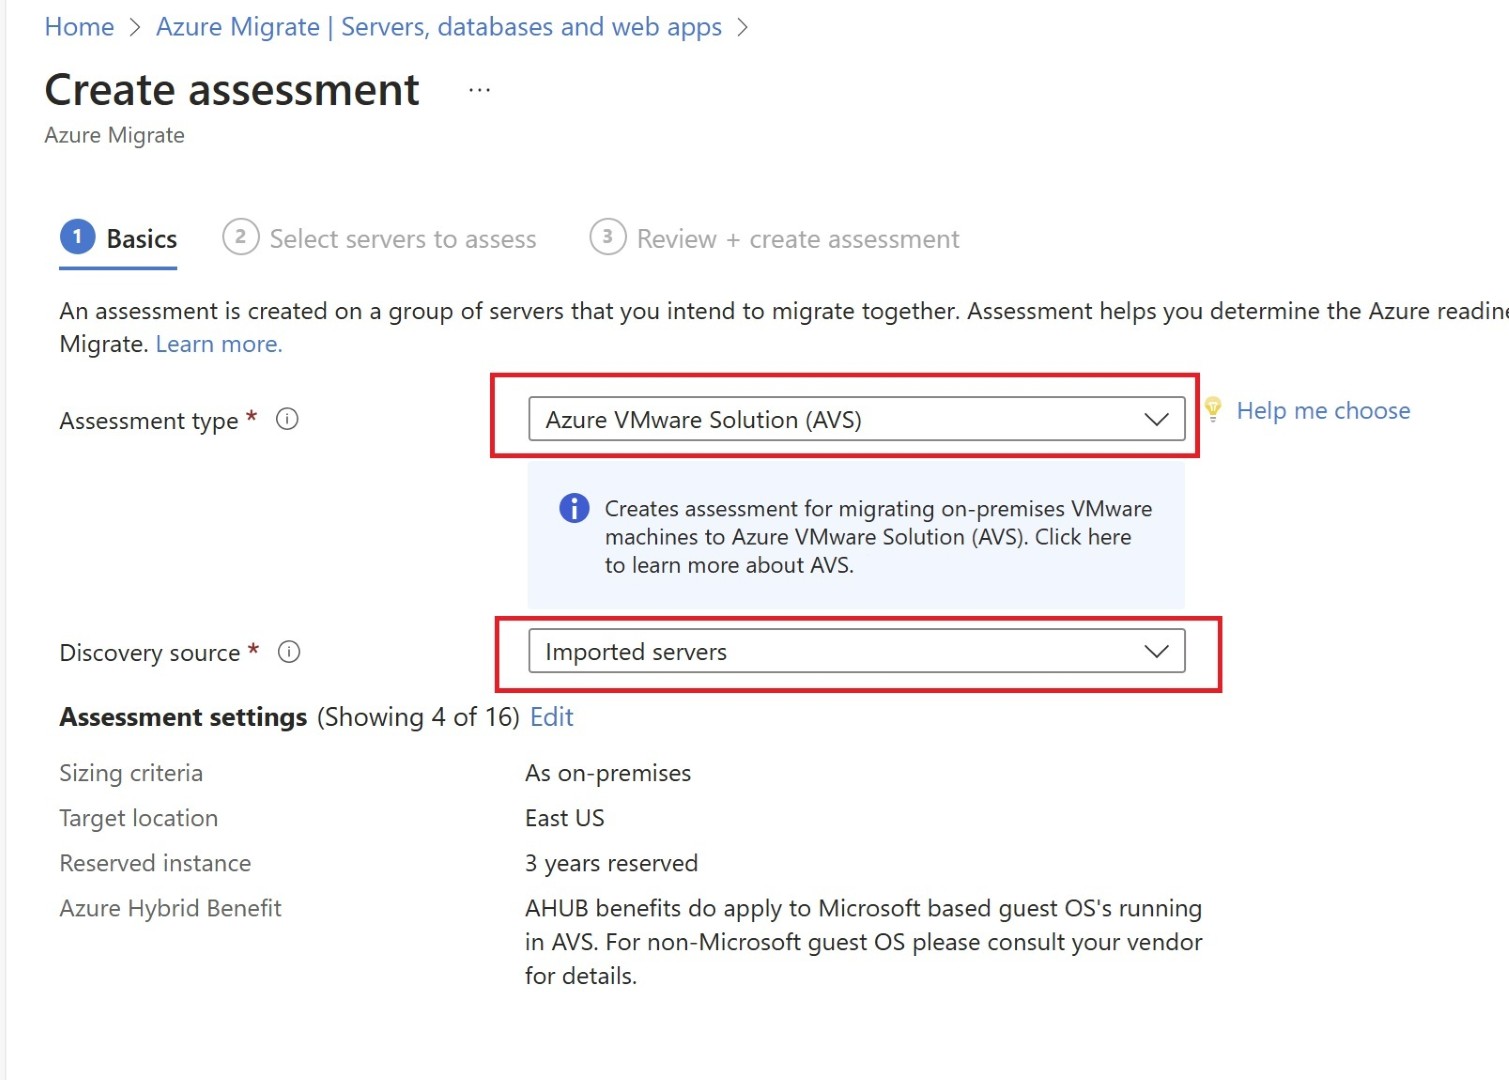
Selecting AVS assessment.
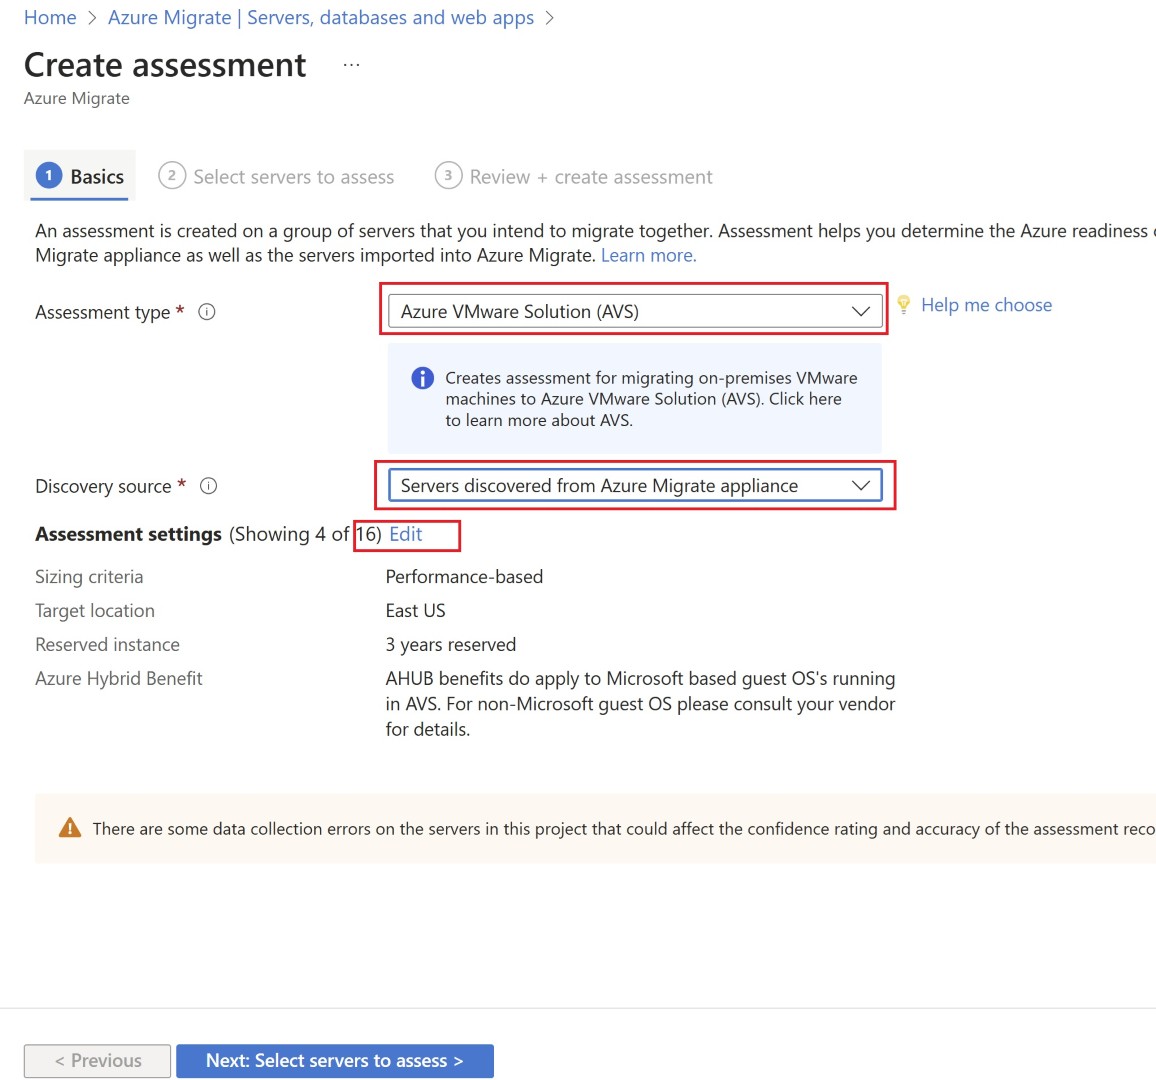
Making sure discovery source is selected as Azure Migrate Appliance.
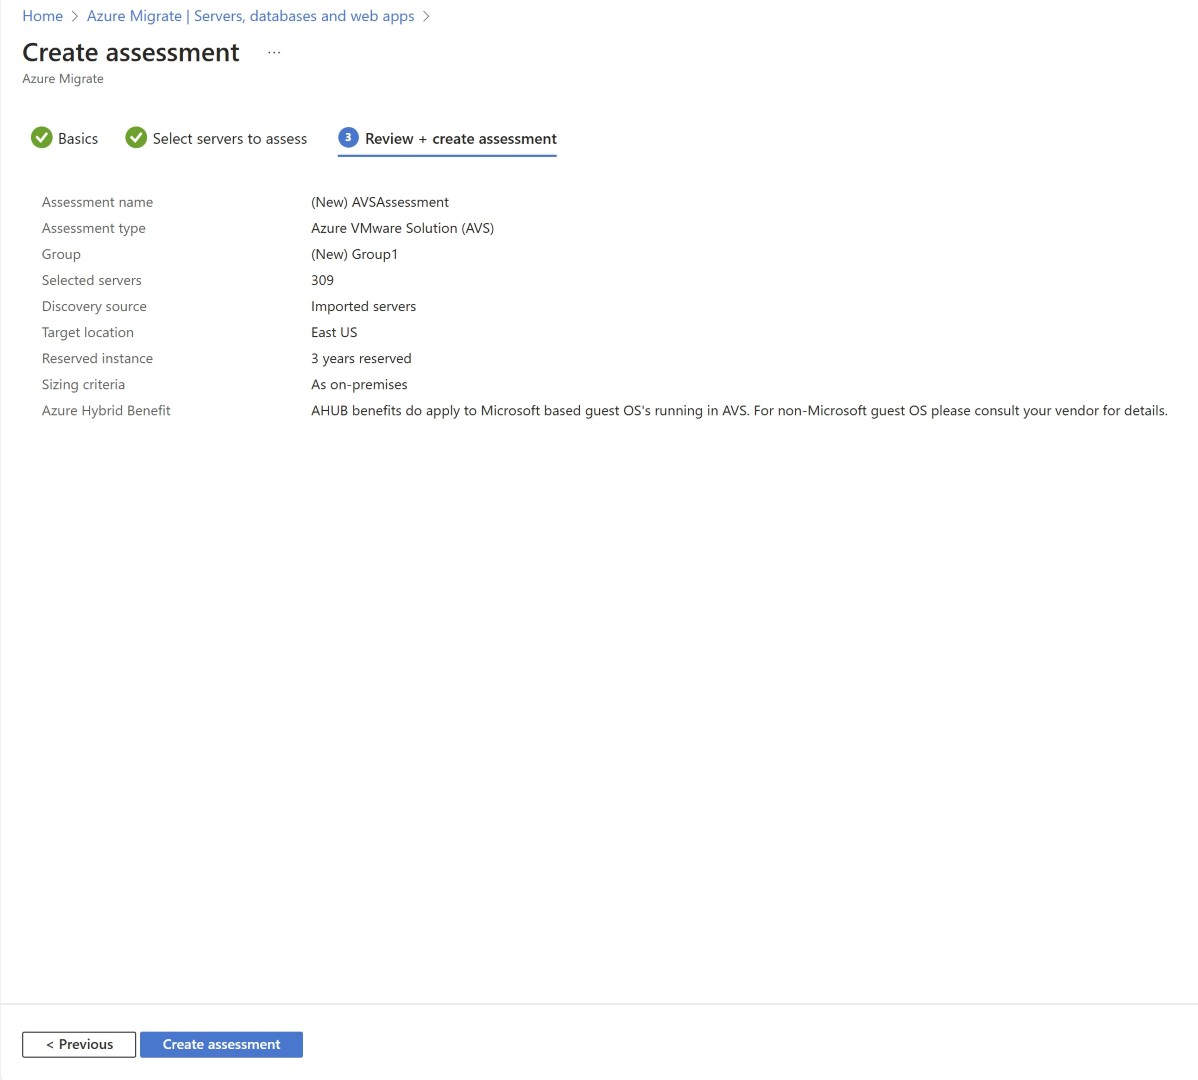
Making sure you’ve selected the right set of parameters as your output will be based on these selections. 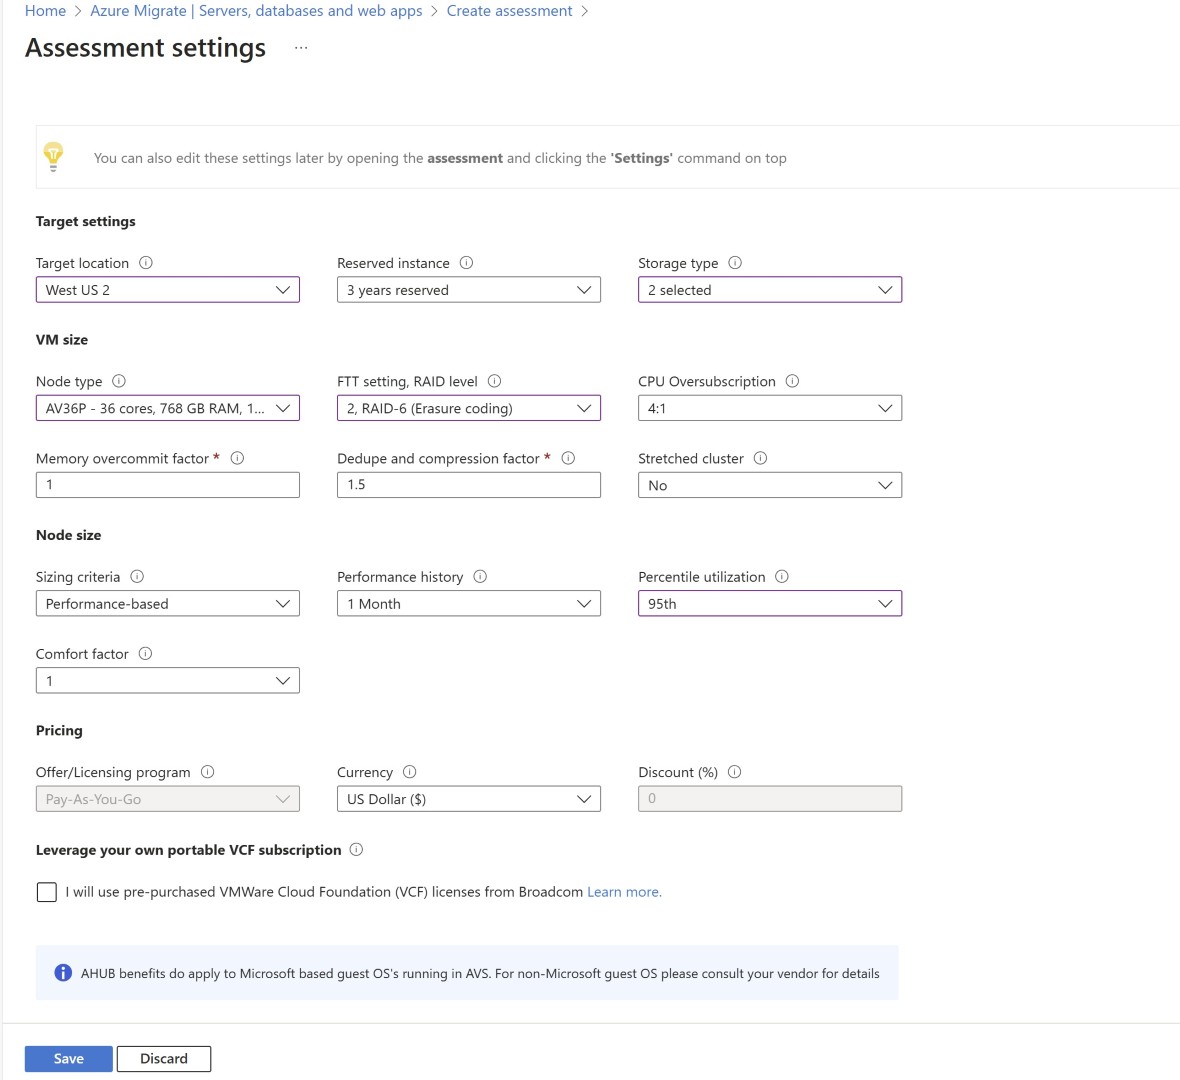
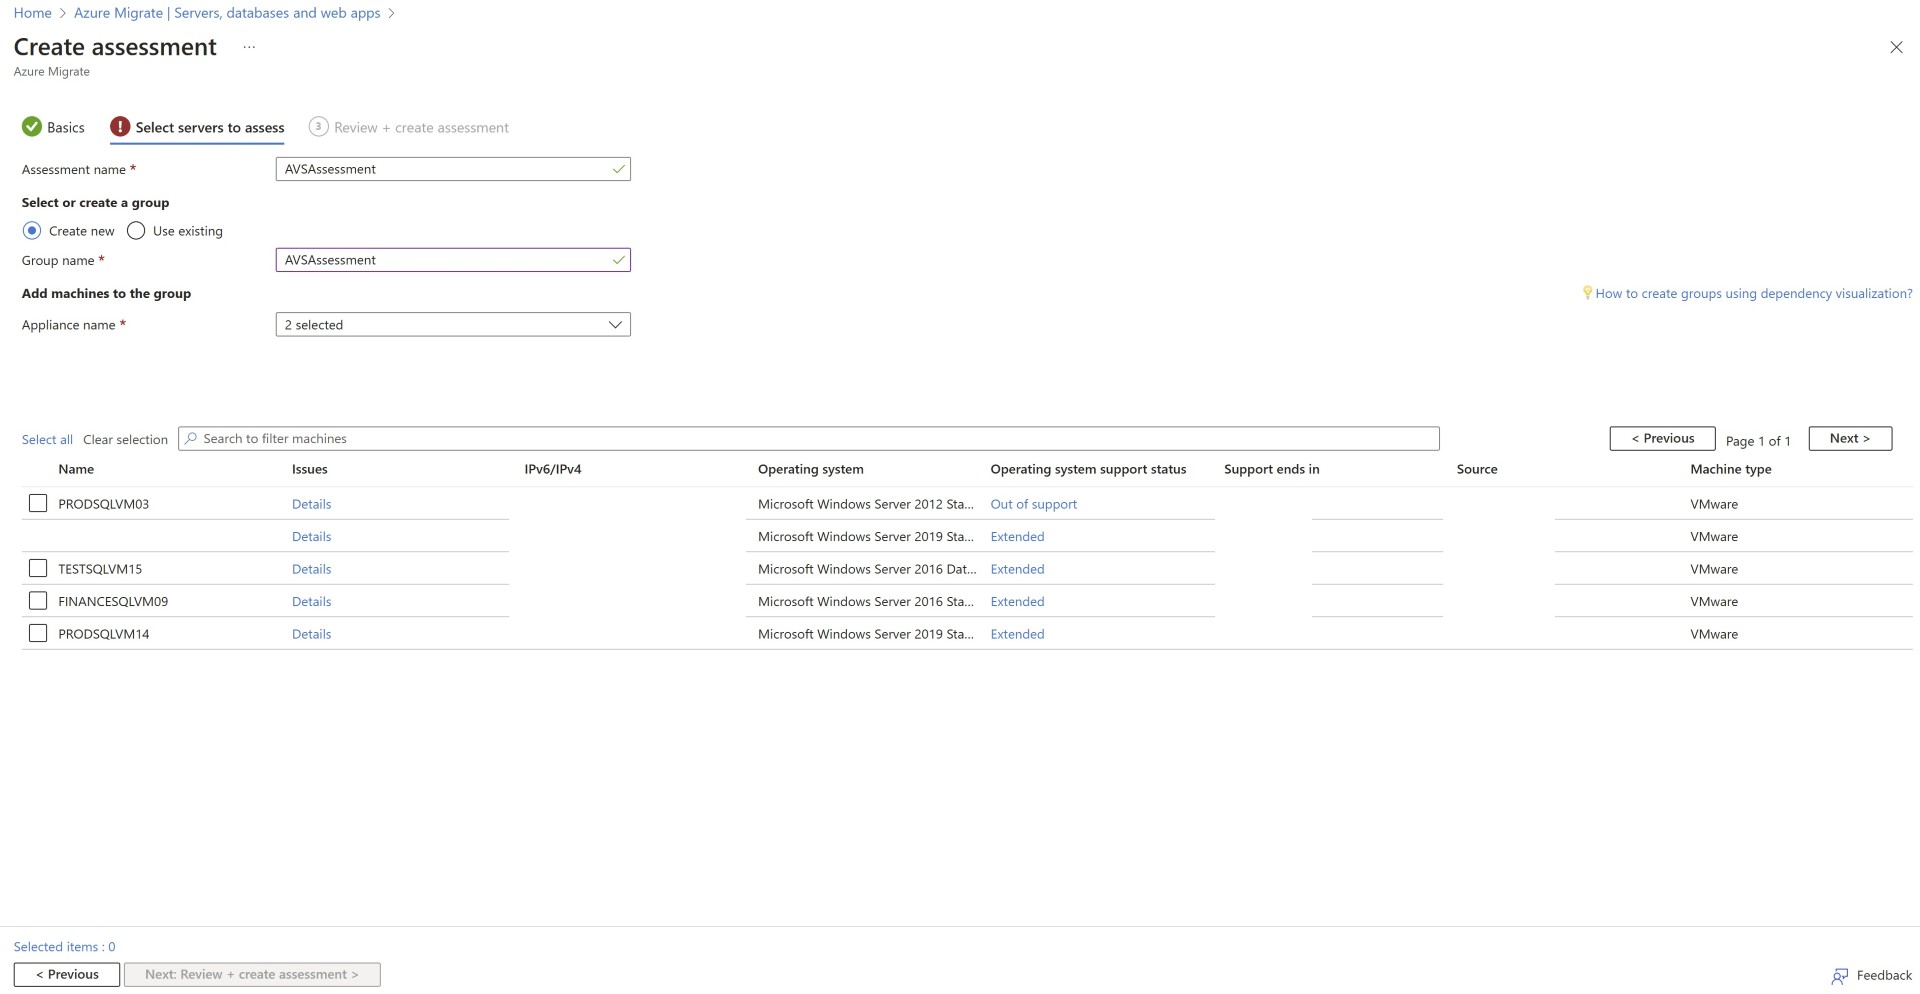
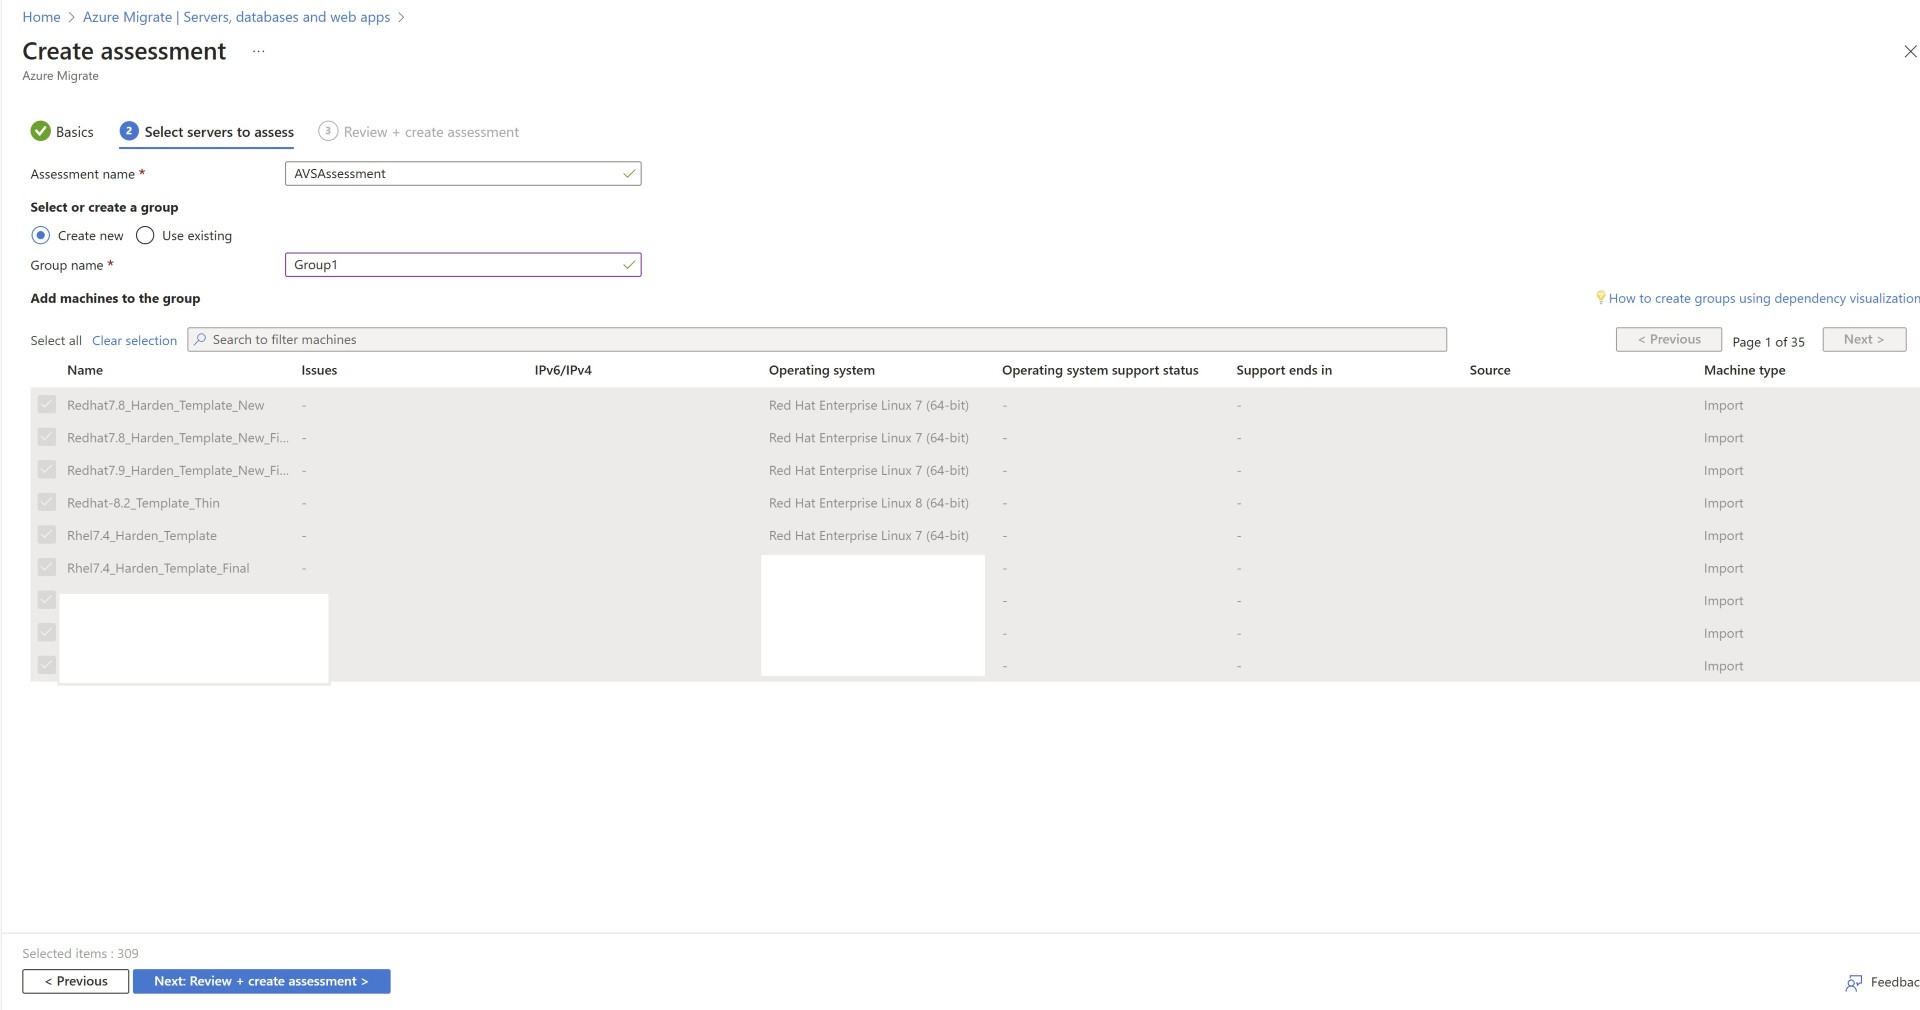
Select the servers for assessment.
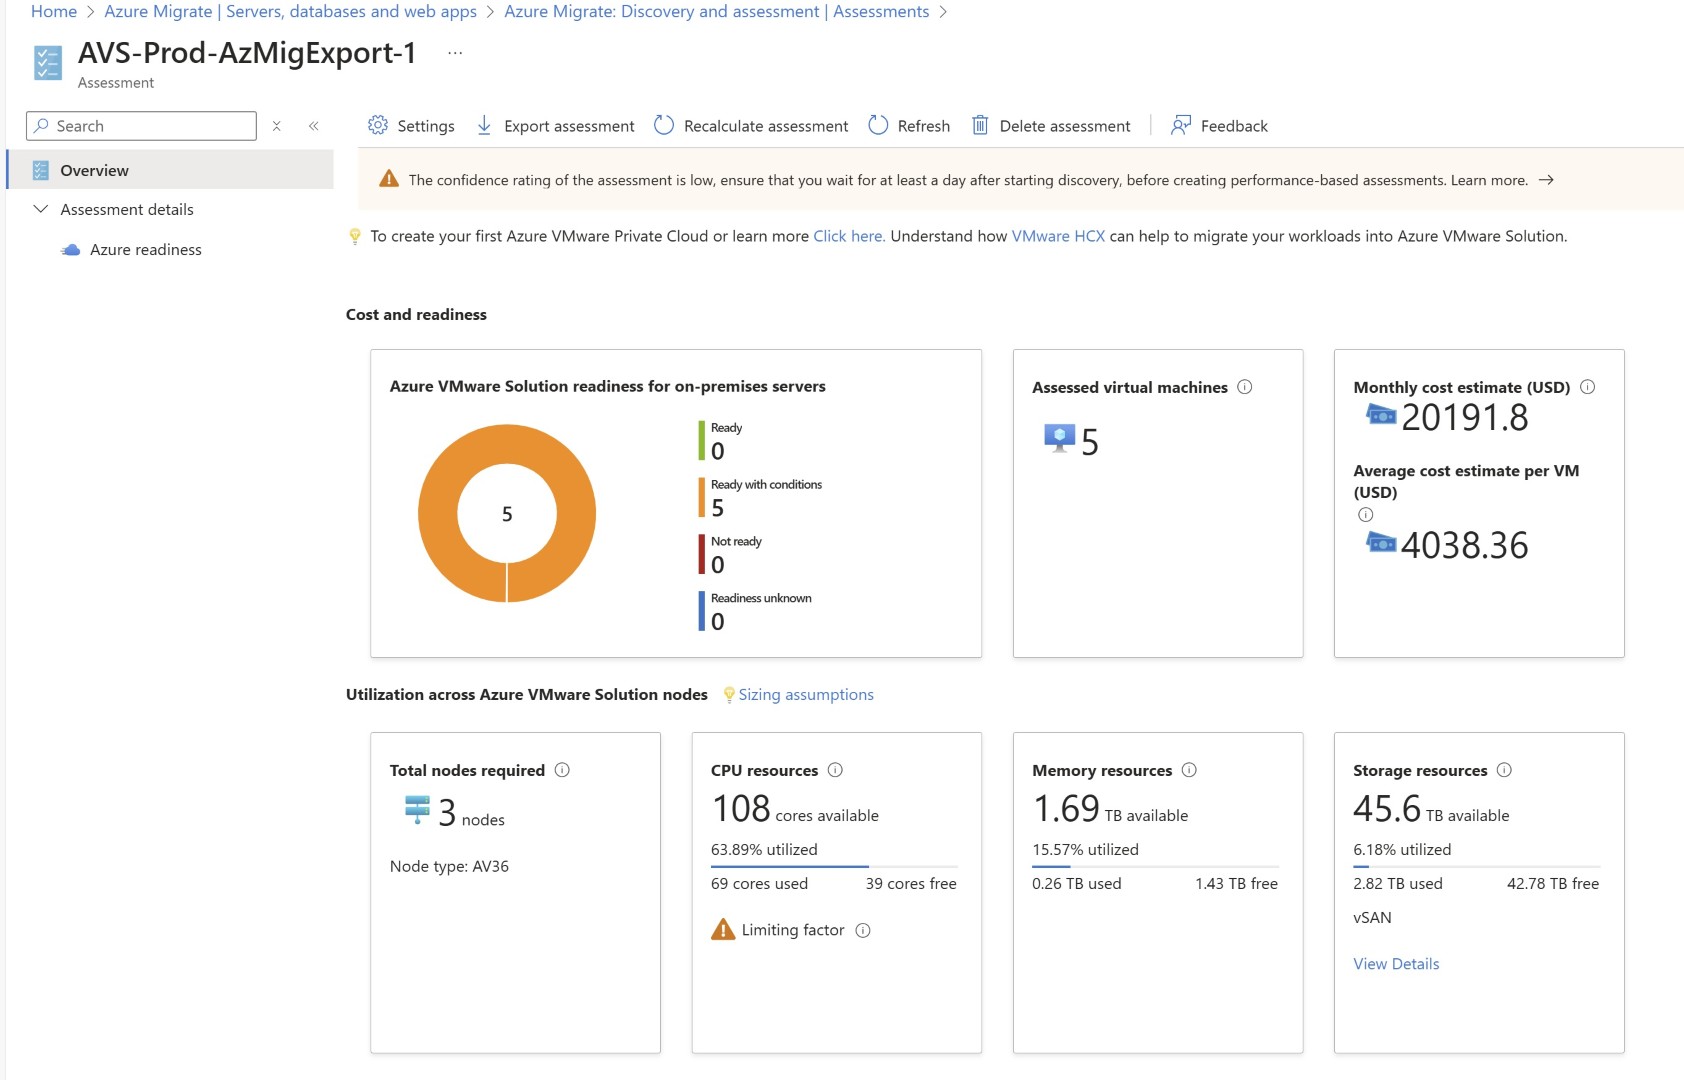
This is the output of the report once AVS assessment is created. This will show the node count required and also the storage.
Import Based
This is as-is sizing based on the RVTools import method. There is no manual calculations which are required for storage and Node. You’ll need rvtool tools export data which you need to import in Azure Migrate project and it’ll do computation to provide AVS node sizing and storage required. Though this is through azure Migrate however there is no appliance installation required in this method. Currently this is in preview.
Before creating assessment, you’ll need to import the RVtools so that all these servers will show under discovered servers. 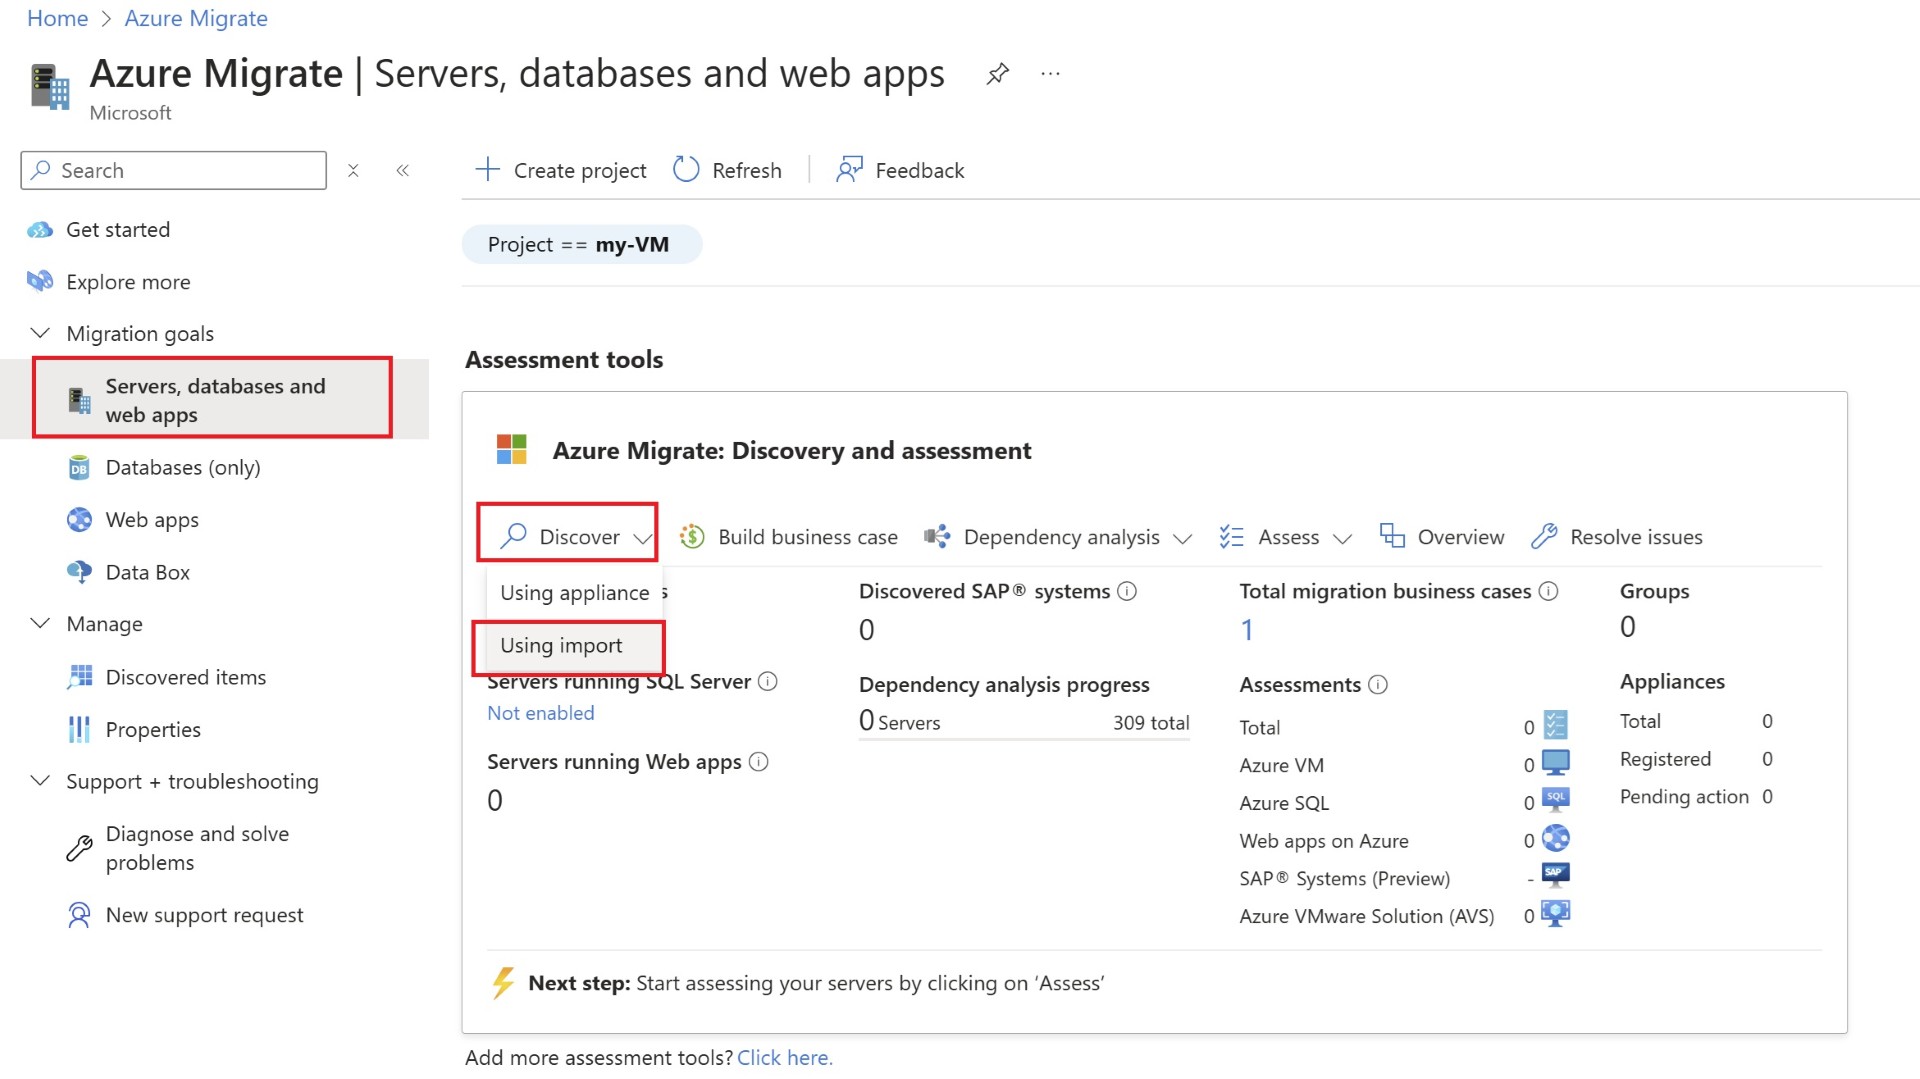
Selecting the preview option of RVTools 
You can find the discovered servers is populated with rvtools data. 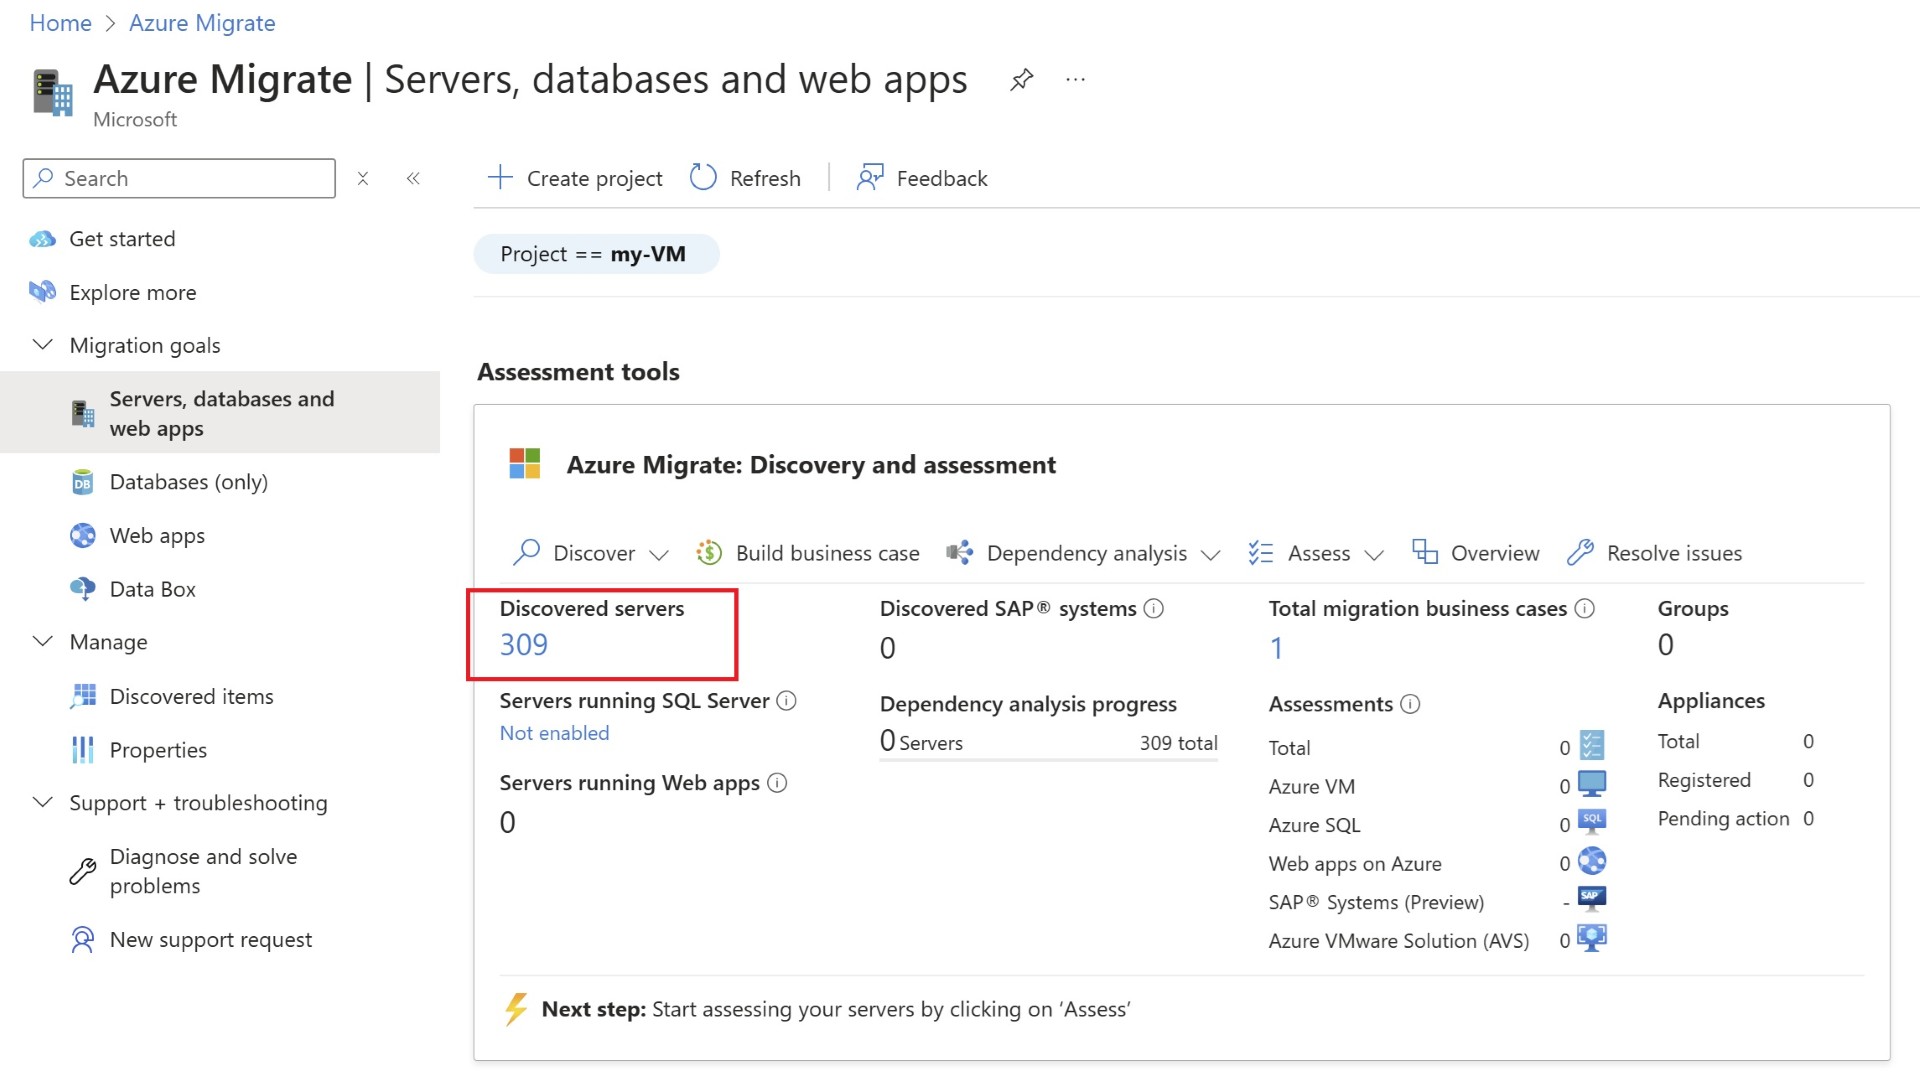
Now you’ll once again create assessment, but this time the selections would be the Imported servers instead of Azure Migrate appliance. 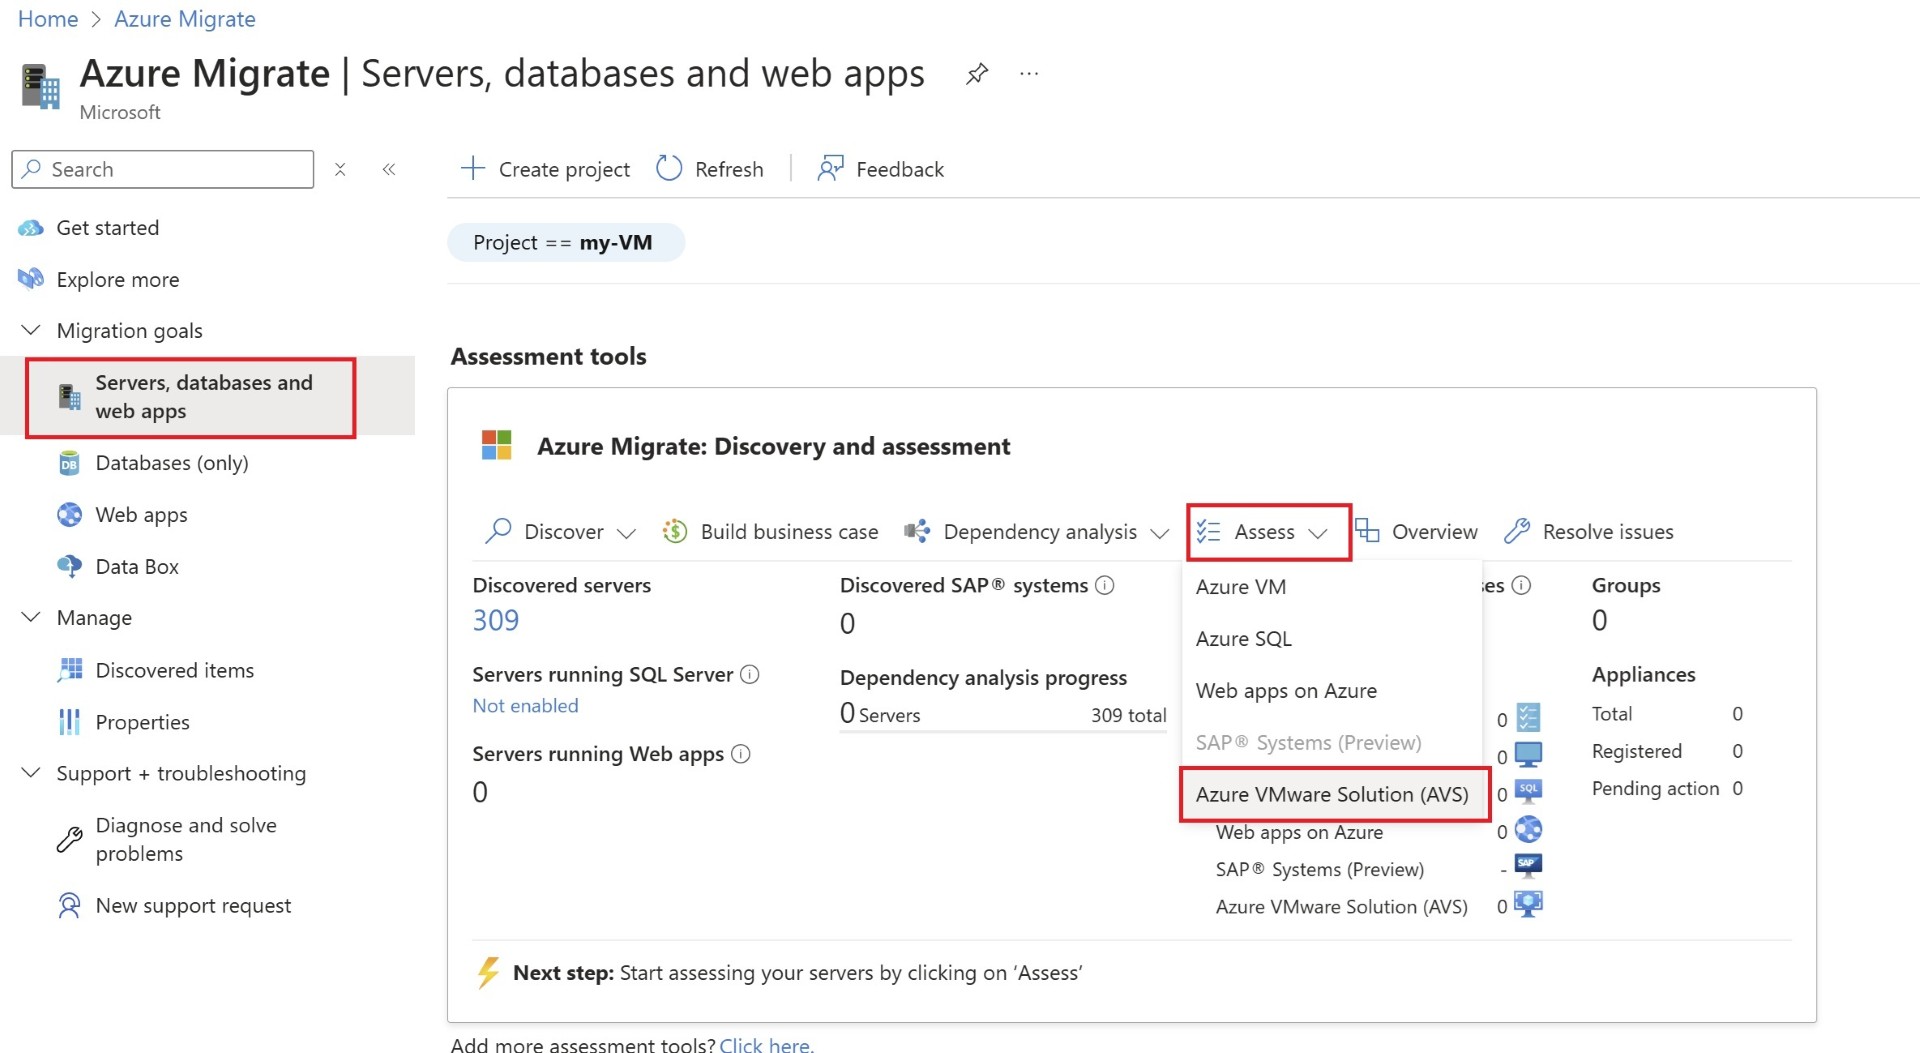
Now the output of the assessment screen shows the AVS assessment count as 1. 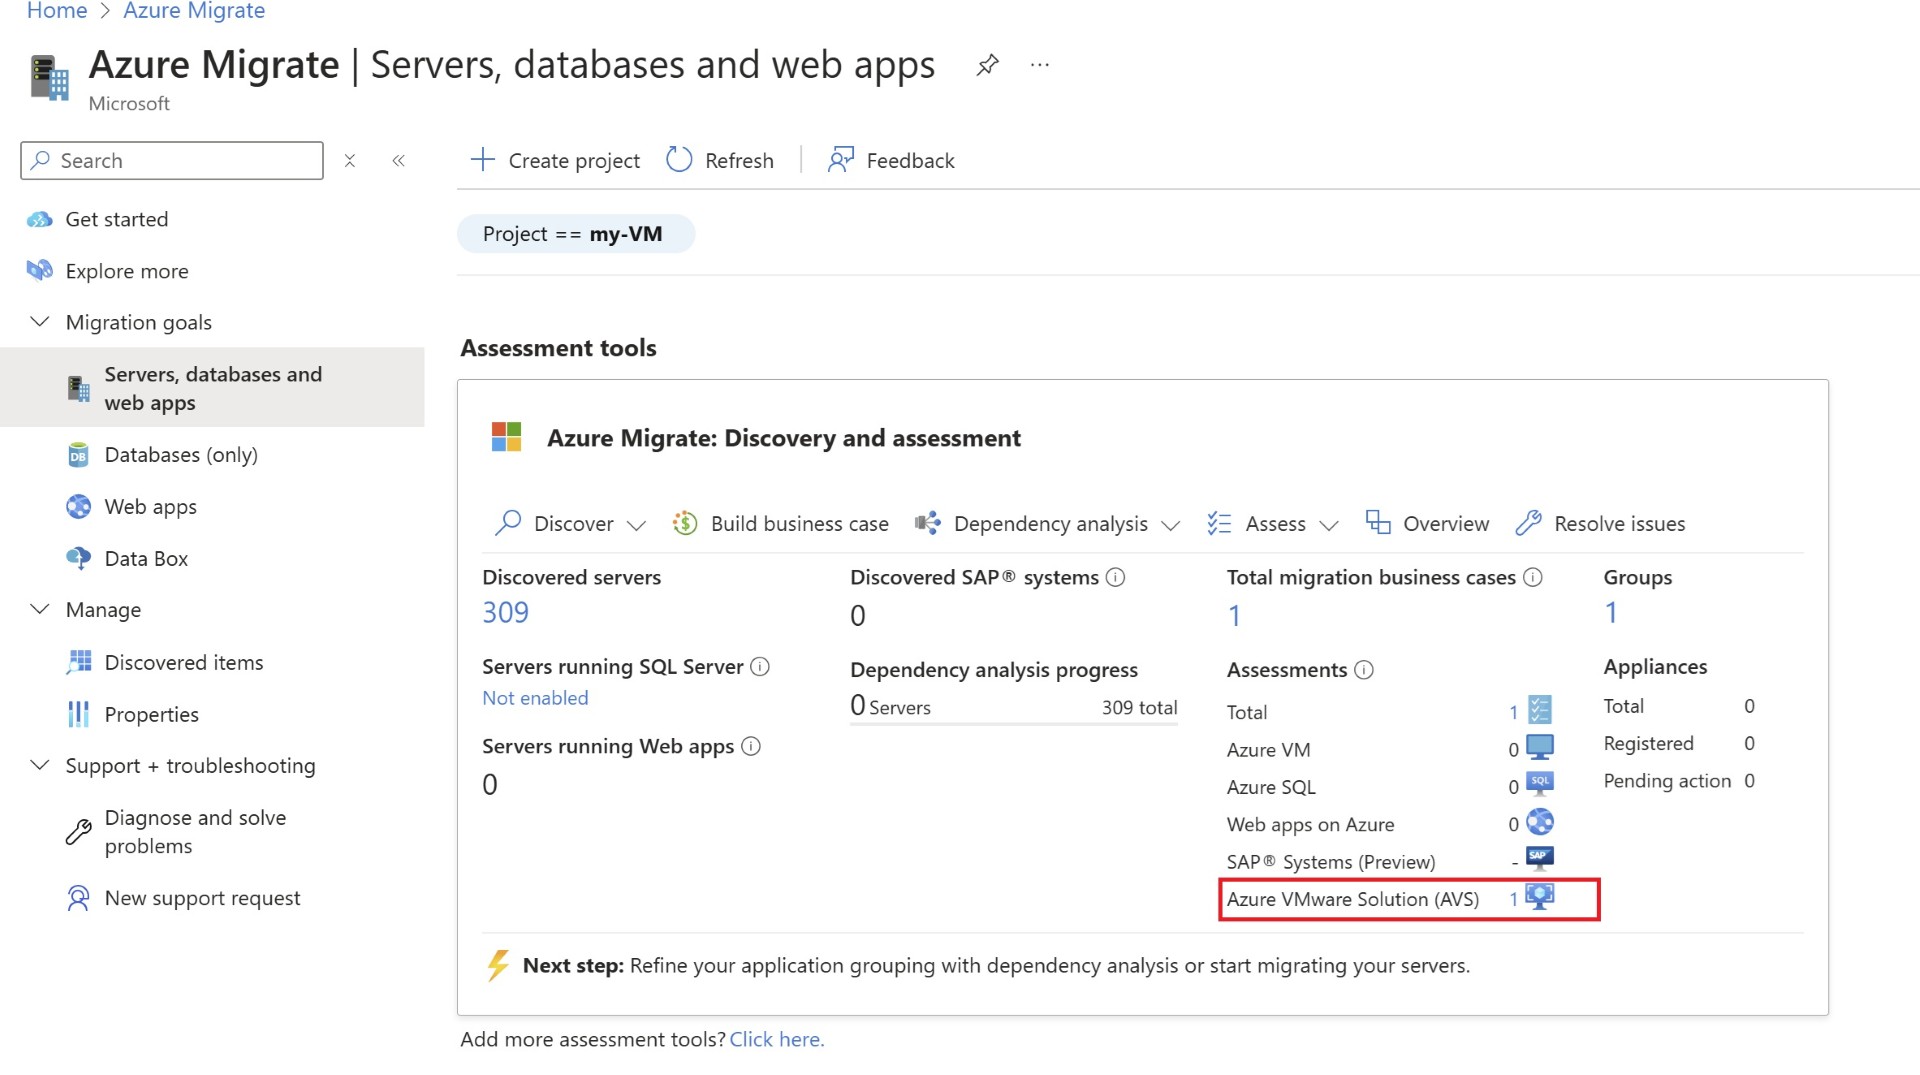
This screen will show the total number of assessment which were created. 
Once you open the assessment, it’ll show the overall size of AVS nodes required along with storage. 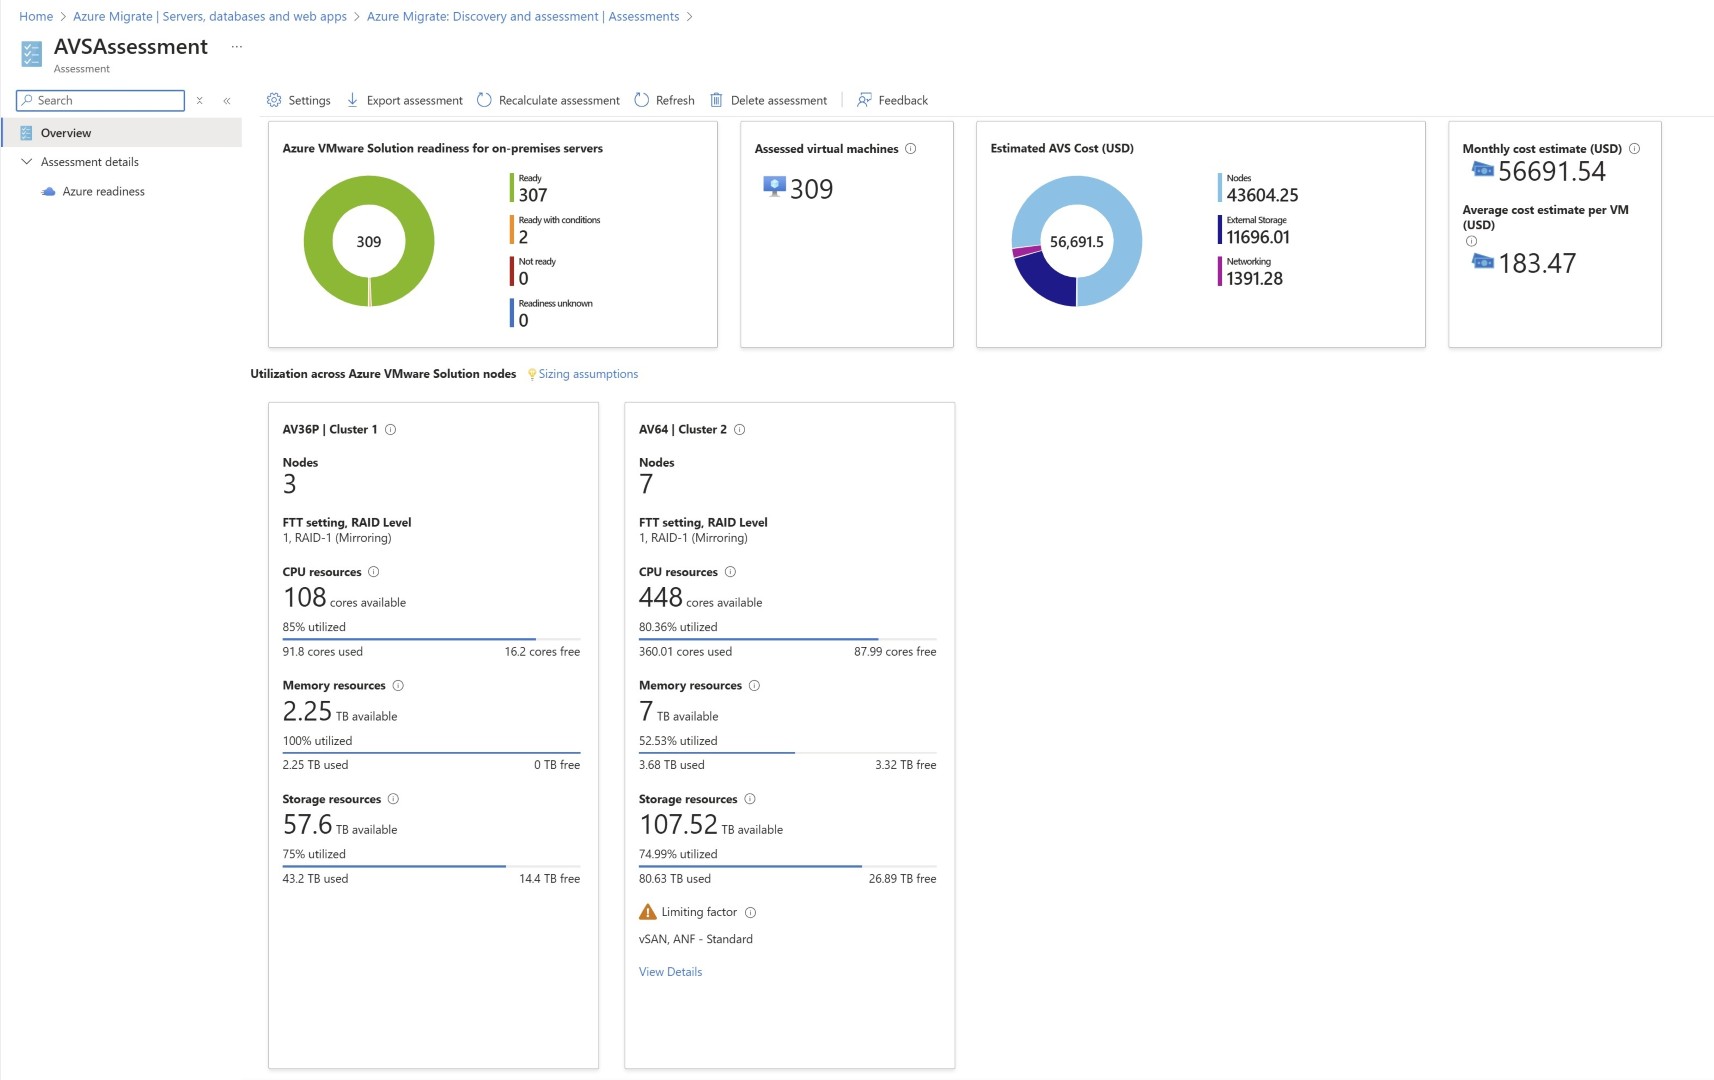
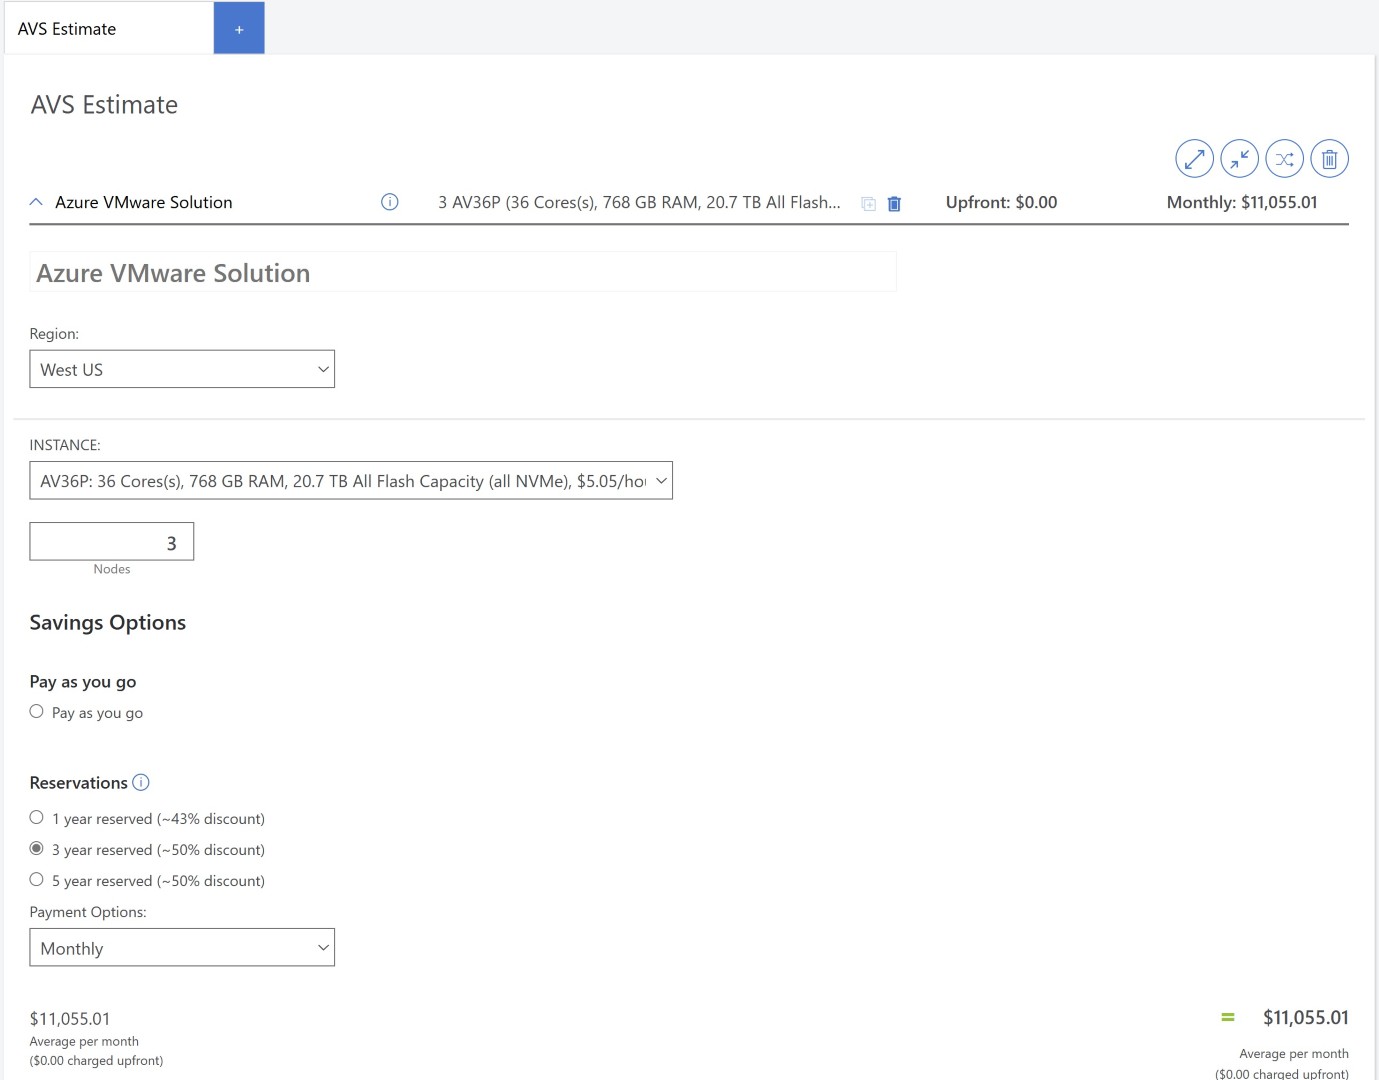
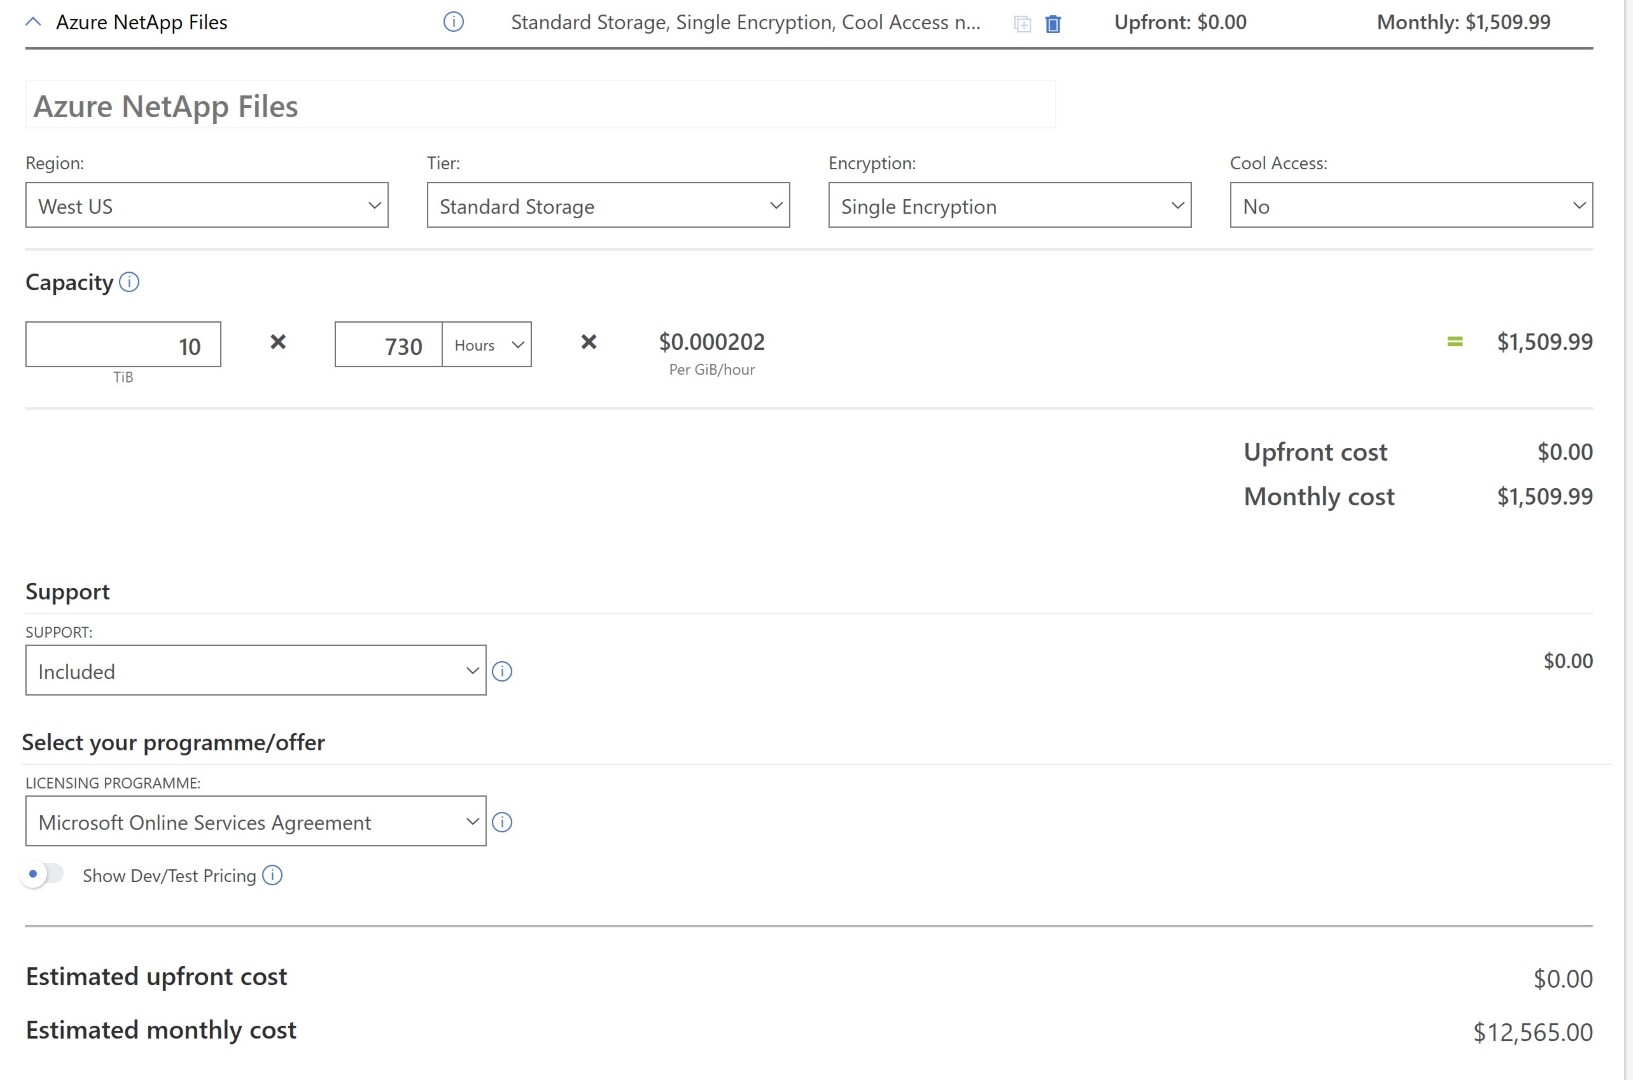
Calculate AVS cost using Azure Pricing Calculator
In this section, let’s do sample AVS sizing through azure pricing calculator. We’re not adding any networking component like Express Route Gateway, Azure Route server or Firewall in this, hoping landing zone is configured and ready and we’re just estimating what would be the AVS cost itself.
https://azure.com/e/e39866f1330f4aa1b7b84e582940fb88
I hope this blog help you in AVS node assessment. Once this is done you can quickly start the Network discussion and overall migration plan. Share the blogpost if you like it.
Happy Learning!
Subscribe to my newsletter for the latest posts and summaries. Your privacy is paramount, and your email stays with us securely. click the link to submit your email. https://forms.office.com/r/6ysKm4nkp4
