Learn How to master Azure Databox with these simple tips
This blog is a collection of some practical experiences of working with Databox. Things that you should keep in mind while you order, connect and transfer data via Databox.
I won’t go through the click-next and finish experience as it is already documented in Databox documentation. Step by Step tutorial
Requirement
First thing you’ll need to ask yourself whether you really need a databox for data import? As there are other great tools to copy data to Azure storage, disk over express route or over internet. (azcopy, robocopy and ADF) these can be used. In most of the scenario you’ll need to factor the reasons mentioned below before thinking about copying data via Databox.
- Privacy/legal and security team approval.
- Order and shipment: it usually takes 5-10 business days.
- Data copy to databox from file server/NAS
- Shipment back to Microsoft: 5-7 business days
- Data copy to Storage account
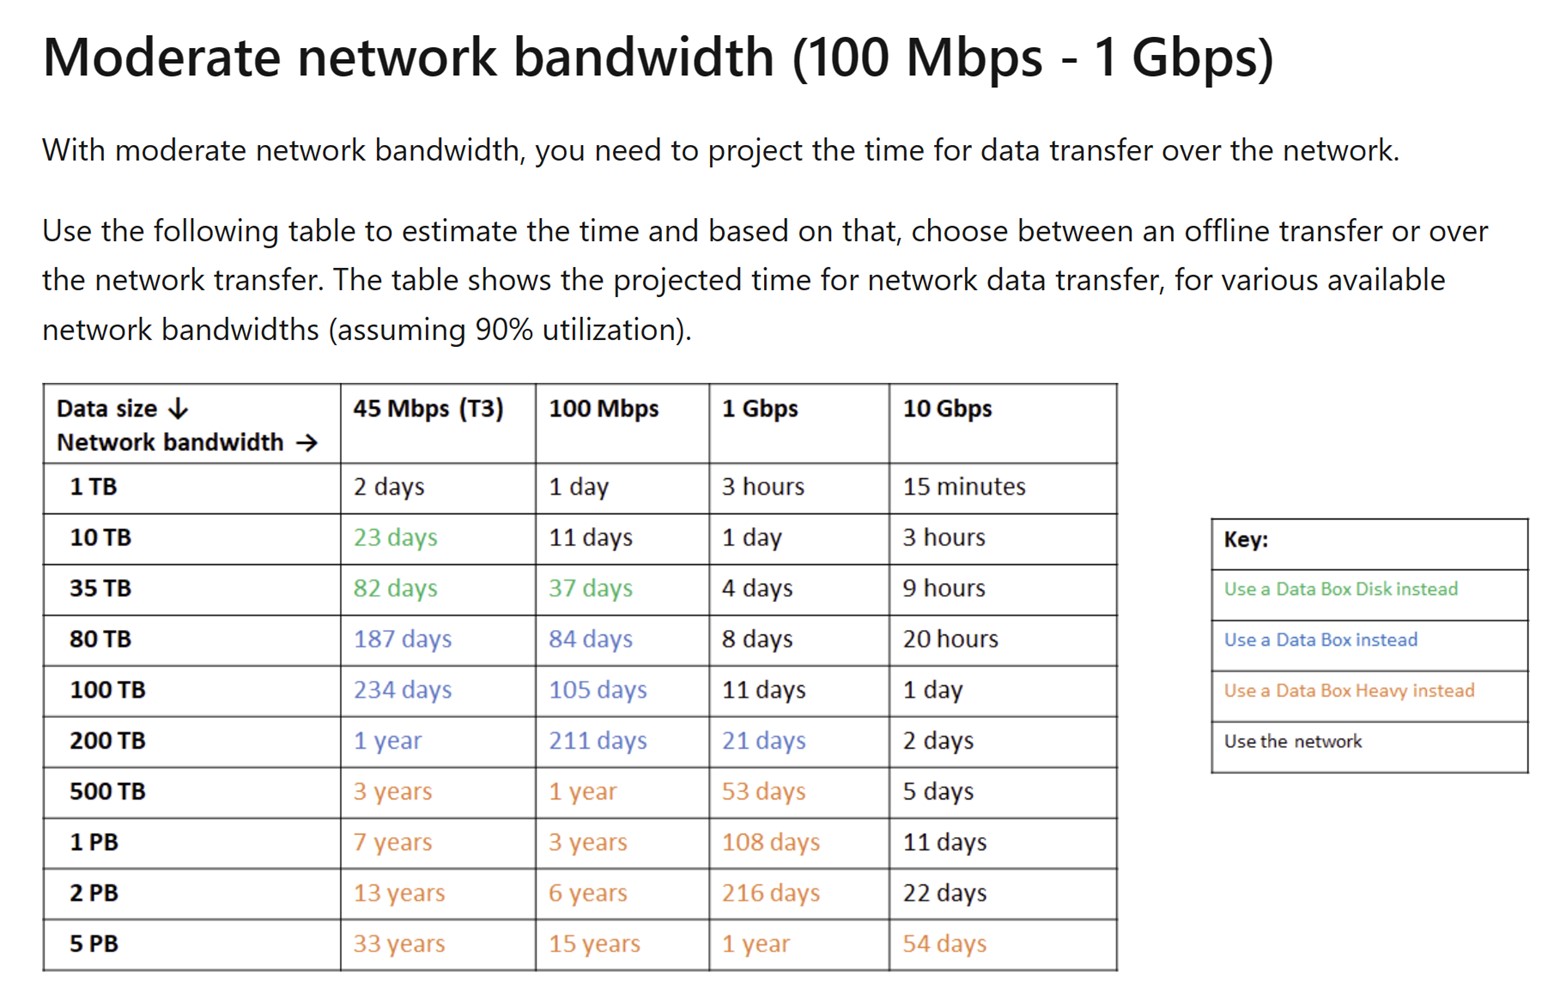
Some sample data transfer speed and time it took to copy is mentioned in below image. This is copied from MS Doc.
Now, let’s proceed further and assume you’ve decided to copy data via Databox. Before you order, you’ll need to know few things about databox. There are different ports Data1, Data2, Data3 and MGMT. Mgmt is used to take control of the databox via a Web UI and set it up. Data port is used to transfer data. When you order a device on the portal you can find the password. You’ll need to enter the password to unlock the device.
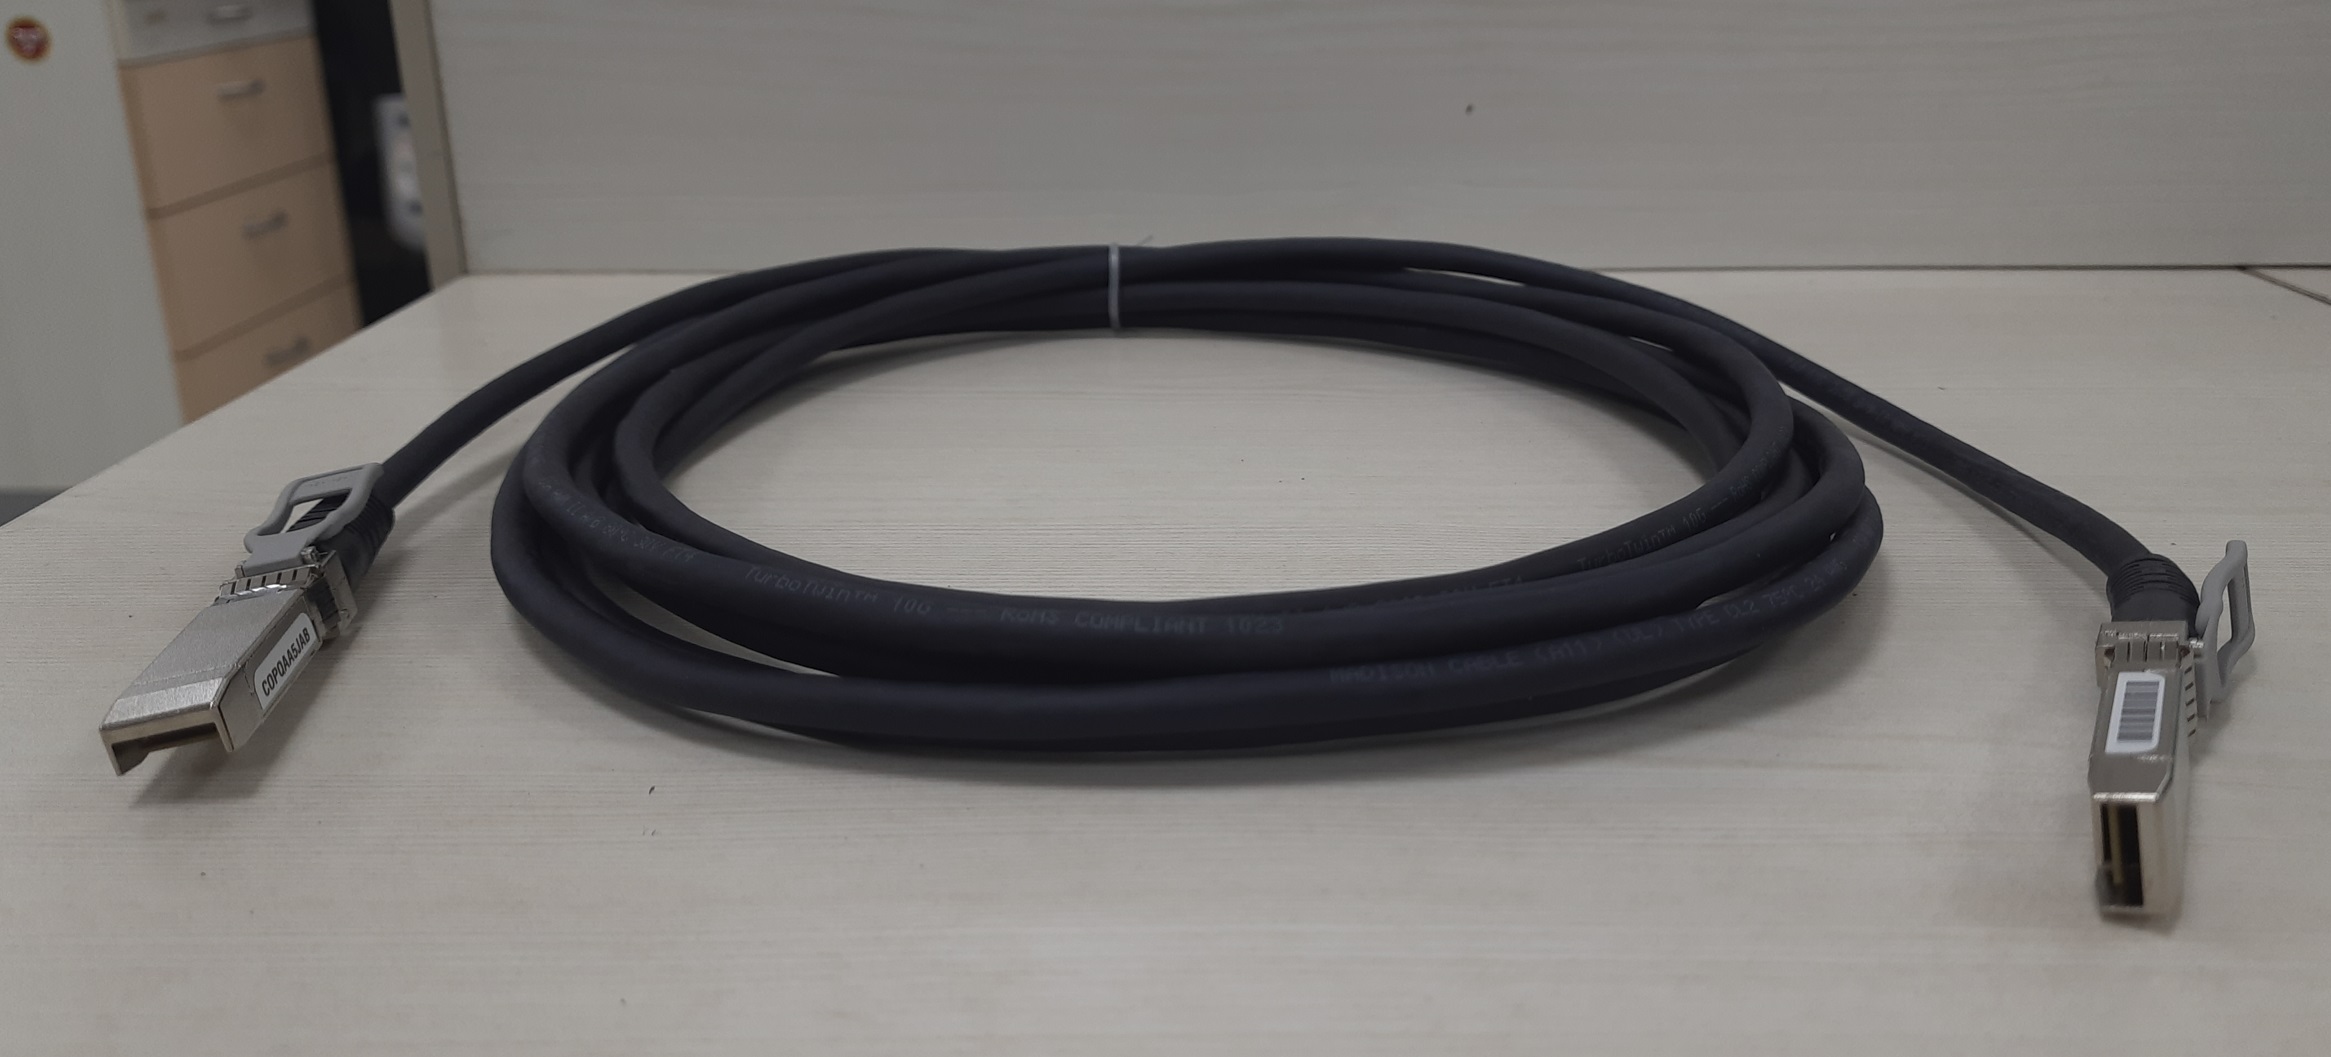
Port and Cables
One common question you’ll get from Datacenter Operator team is about cables.
- You can use RJ45 CAT6 cable to connect to MGMT port.
- Now when we talk about Data 1-3 port as the name suggests these are used to transfer the data. And based on the speed and type of cables you want to use you can use any of the cables.
- You can use RJ45 CAT 6, RJ45 CAT 6A cable, 10-GbE SFP+ Twinax copper, 10-GbE SFP+ fiber optic cables.
- If you’re connecting via RJ45 cables, then use Data 3 port.
- And if you’re using 10-GbE SPF+ twinax copper use Data 1 port.
- if you’re using 10GbE SFP+ FC then use Data 2 port.
You don’t need SFP+ FC or copper twinax to achieve 10 GbE speed. Data 3 port is also equipped to transfer at rate of 10GbE with RJ45 CAT6A.
You cannot do NIC teaming. This is not supported.
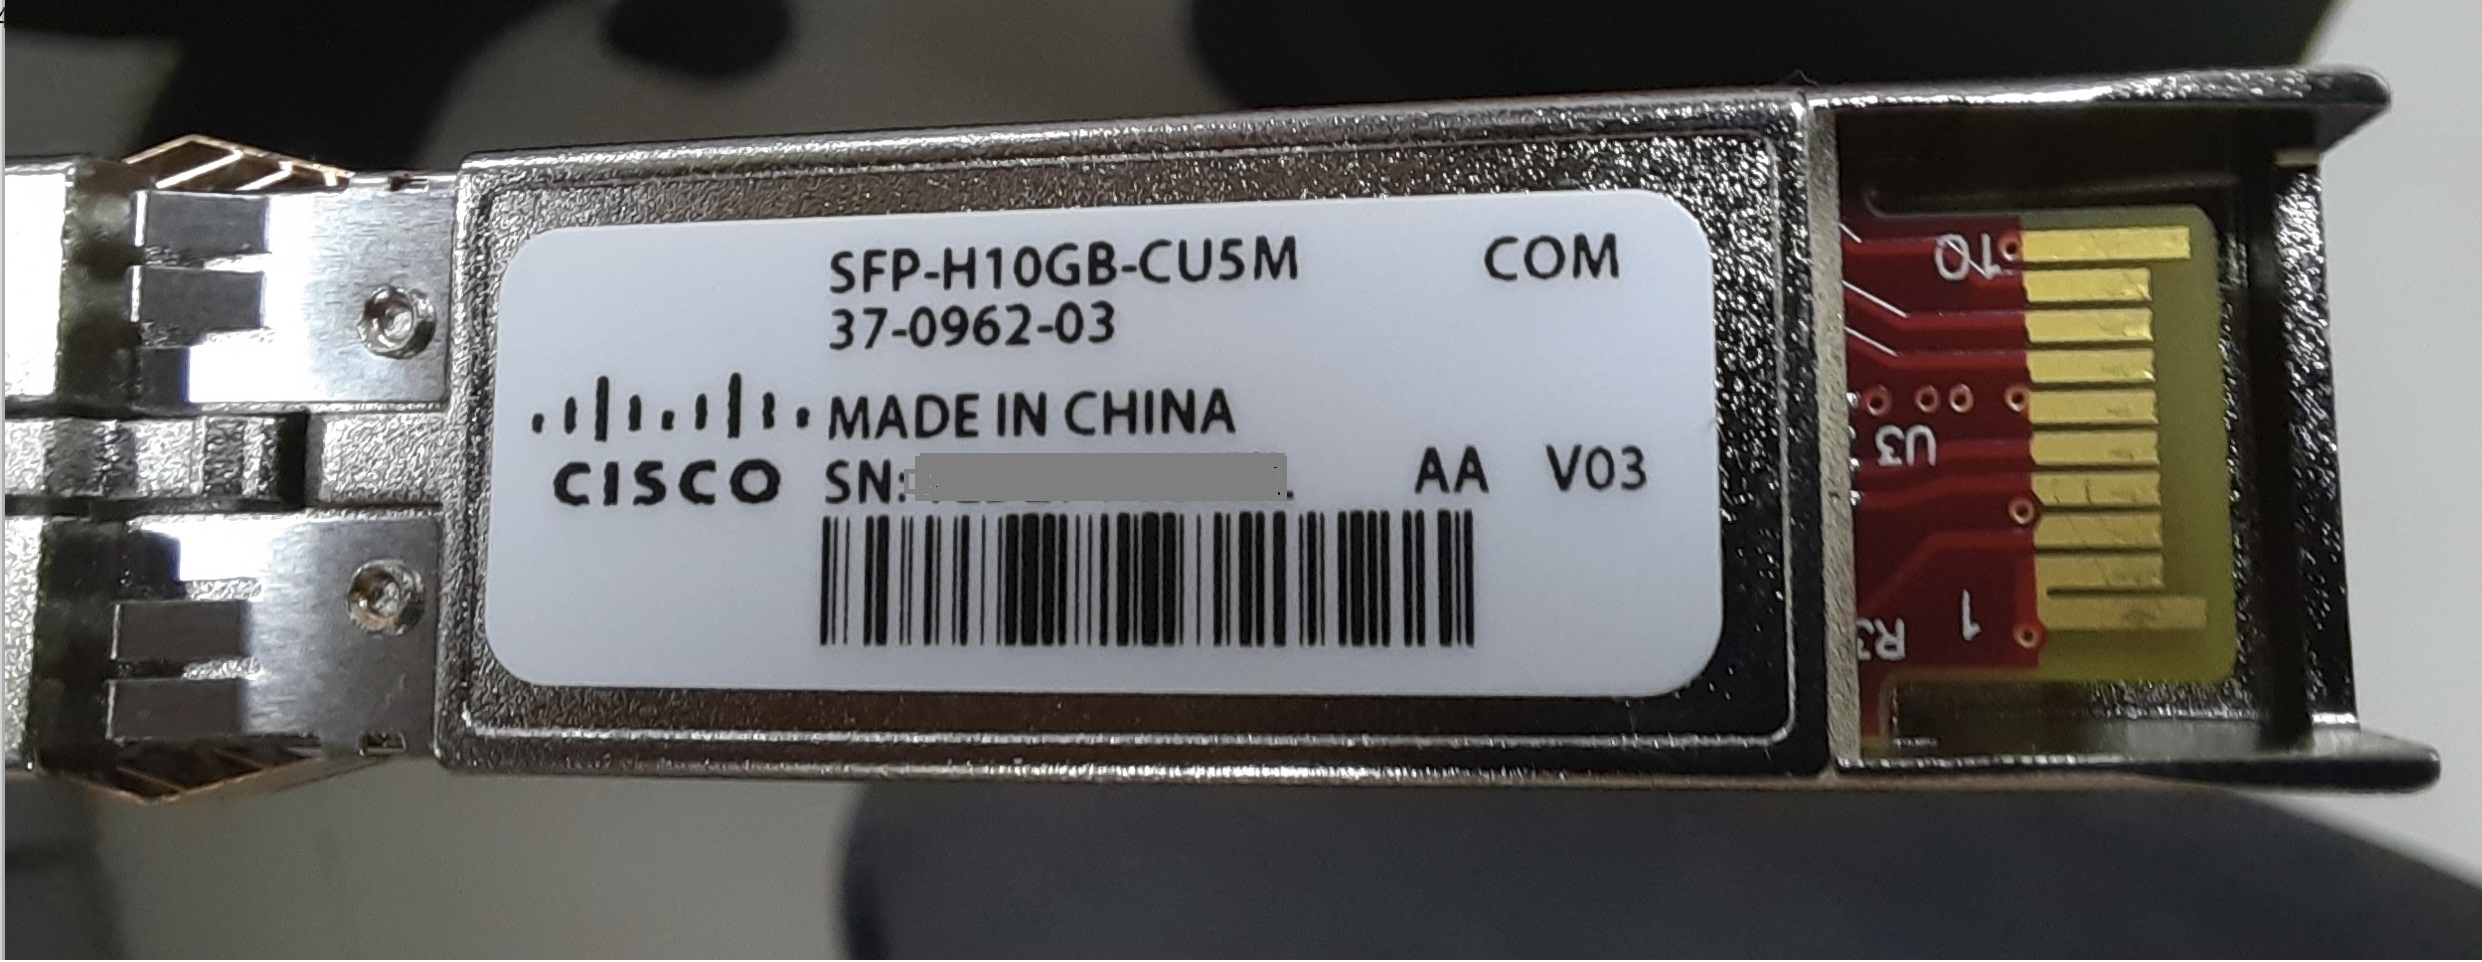
When we say 10GbE, then it is not only the Databox port. It is obvious you’ll need to check your switch, and switch port to which you’re connecting Databox if it is also 10GbE. If you want to check which cable is supported, you can refer to this extensive guide.
List of supported devices/cables
Mine looked like this:
Order
When we order databox and start filling details on portal. You will be asked to provide Storage account details to which data box data will be imported in. You can select more than one storage account.
This can be a new or existing storage account where you’ve files stored. Copy data operations won’t impact on the existing data. Unless you’re putting files in container or file share which contains files with the same name it’ll overwrite. Hence, it’s recommended to create a fresh container or new file share under which you can proceed with copy operation.
Also, if you’re planning to transfer files into Azure File share, please keep in mind to Enable large file share.
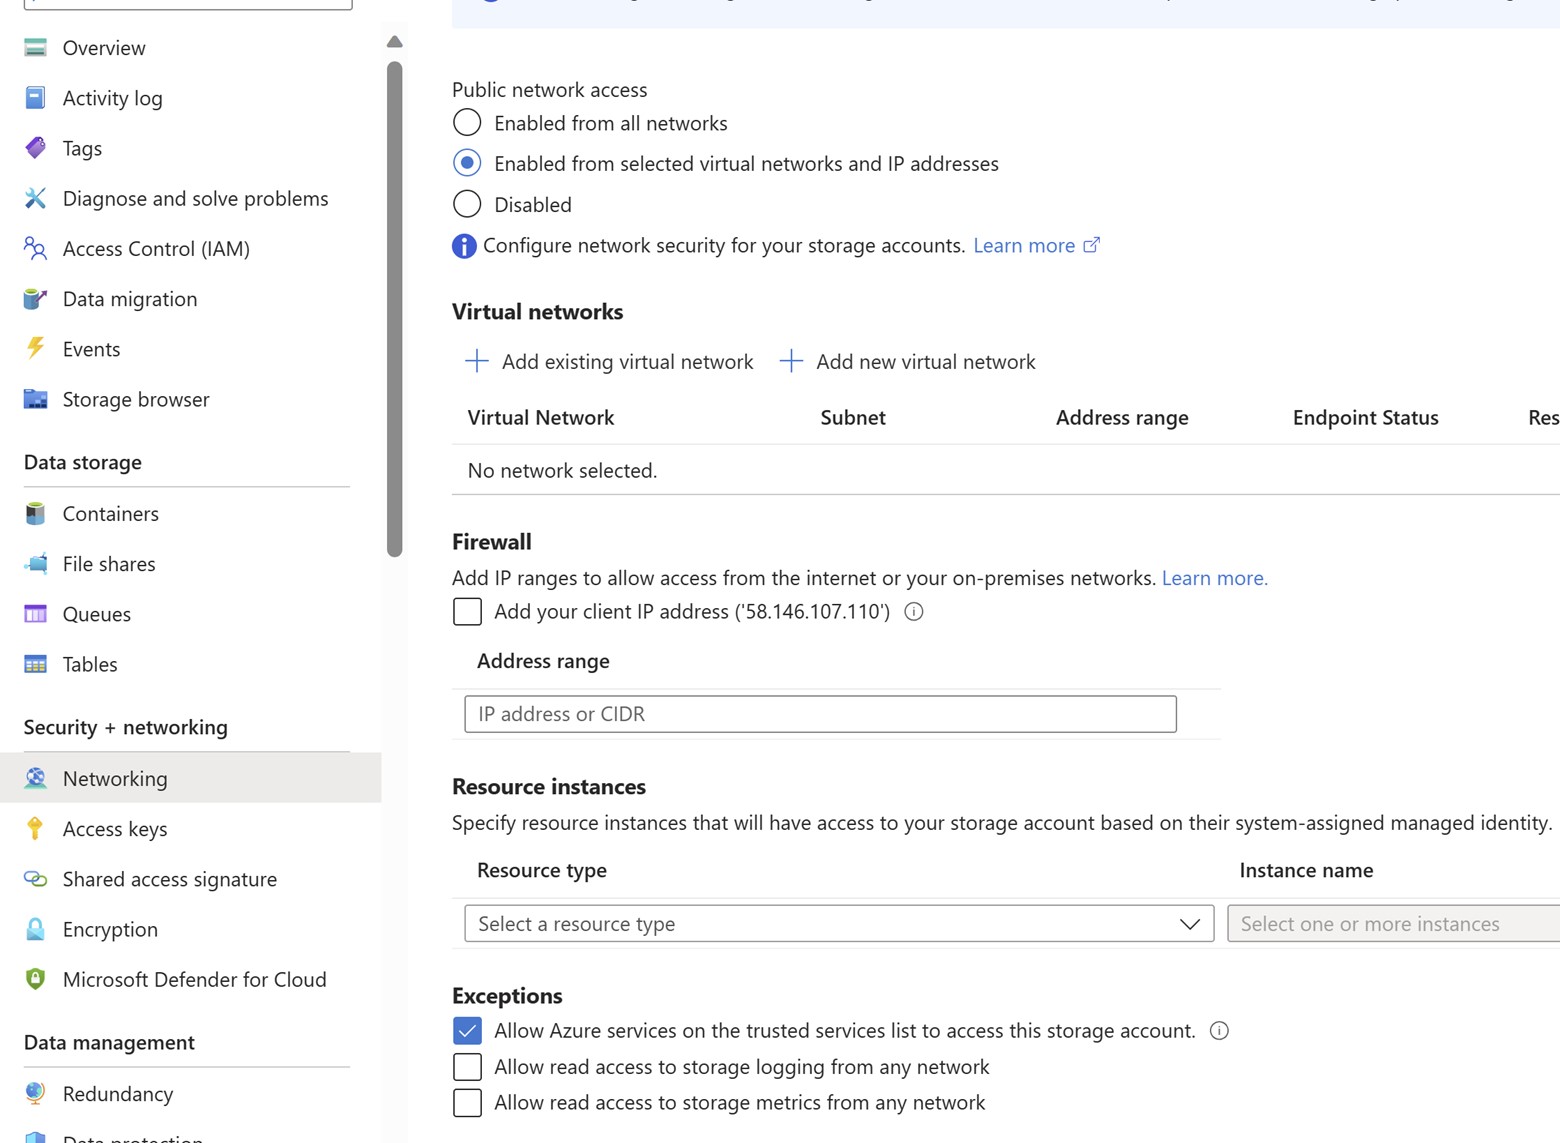
If you’ve enabled private endpoint on storage account and have disabled public access. You’ll need to make sure you check the box which allows trusted service to connect to storage. Otherwise, you would be able to copy the data to databox but the copy operation from Databox to File Share would fail.
You can order the device, copy and then Microsoft will erase the data and will re-use the same device. If you need your own disk for data transfer and then you want to destroy or keep it with you then you can explore the databox disk option where you can use your own disk. Or legacy Import/Export service.
Copying
Once you order the device it can take a couple of days to arrive. Mine took 10 days. (India) Once you get the device, you can activate it by entering the password, and then you can browse through the NAS share to copy data. You need to copy to specific location in databox so that MS copy operation takes specific action. You need to make sure to create a folder under the root when you copy data. creating a folder in AzFile path of storage account will create a fresh new Azure File Share. If you’re creating a folder in the pageblob or blockblob it’ll create a container inside that first.
You can specify the existing share name and files will be copied in the existing file share.
Below are the sample locations you’ll see in your databox
1
2
3
4
storageaccountname_BlockBlob
storageaccountname_PageBlob
storageaccountname_AzFile
storageaccountname_BlockBlob_Archive
You should keep in mind to use robocopy if you want to retain metadata of the files. So that all the files that is copied in AFS shows the correct metadata as on-premises NAS. Robocopy parameters are documented.
This is how it looks like once the copy operation is completed.

Once the data gets copied you can download the manifest files. Which contains all the files which were copied to databox successfully. It’ll show the size of the file and its name. Keep this file with you and compare when data copy is successfully completed in Storage Account.
This is how the manifest file looks like.
1
2
3
4
5
6
7
<file size="10923" crc64="0x51c78833c90e4e3f">\databox\media\data-box-deploy-copy-data\connect-shares-file-explorer1.png</file>
<file size="15308" crc64="0x091a8b2c7a3bcf0a">\databox\media\data-box-deploy-copy-data\get-share-credentials2.png</file>
<file size="53486" crc64="0x053da912fb45675f">\databox\media\data-box-deploy-copy-data\nfs-client-access.png</file>
<file size="6093" crc64="0xadb61d0d7c6d4deb">\databox\data-box-cable-options.md</file>
<file size="6499" crc64="0x080add29add367d9">\databox\data-box-deploy-copy-data-via-nfs.md</file>
<file size="11089" crc64="0xc3ce6b13a4fe3001">\databox\data-box-deploy-copy-data-via-rest.md</file>
<file size="7749" crc64="0xd2e346a4588e307a">\databox\data-box-deploy-ordered.md</file>
Return pickup
You need to send an email to the Databox Operations team and ask them to schedule the return pickup. You’ll need to provide Order Name in your email. adbops at microsoft dot com The team will schedule the return pickup and share with you the delivery receipt and shipping label. Which you’ll need to share with Datacenter operations team to make the device ready to be picked up.
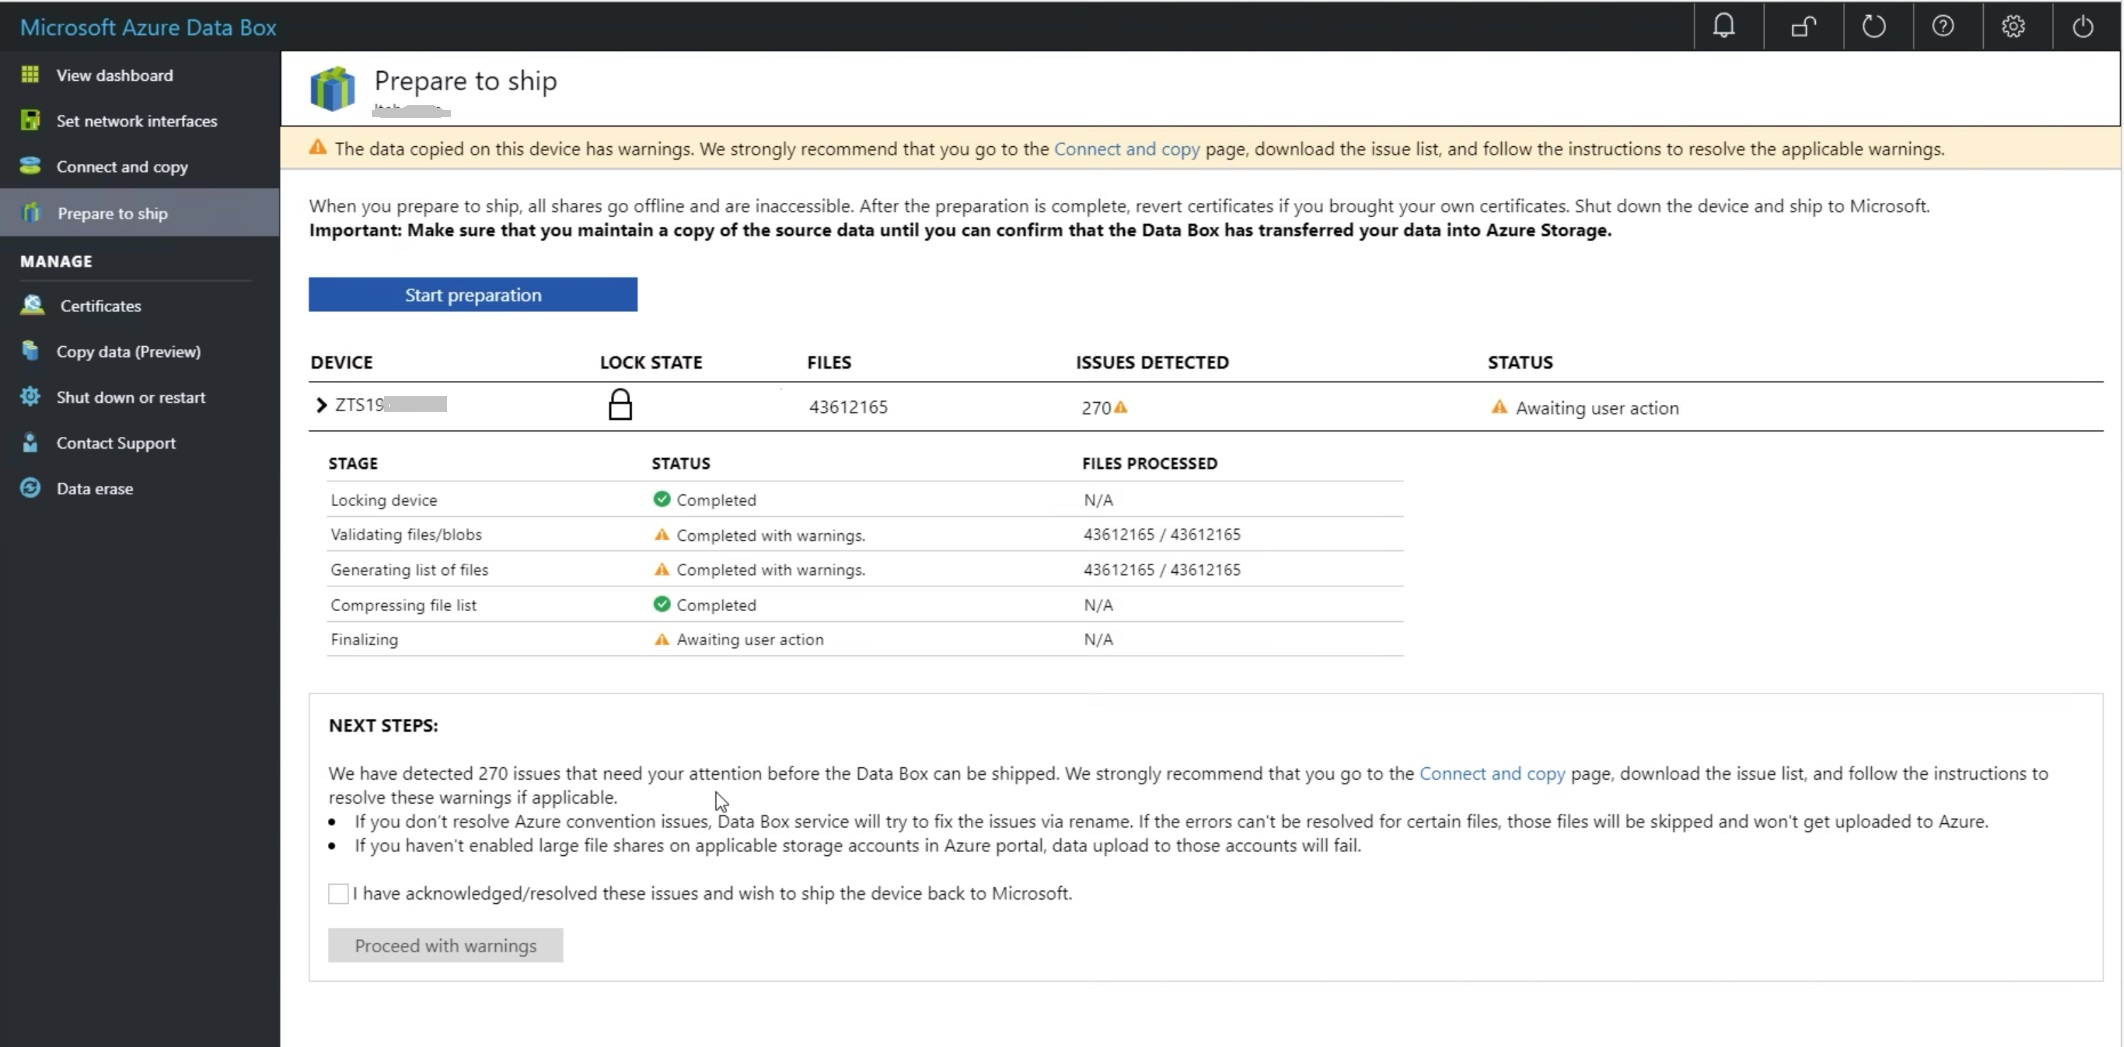
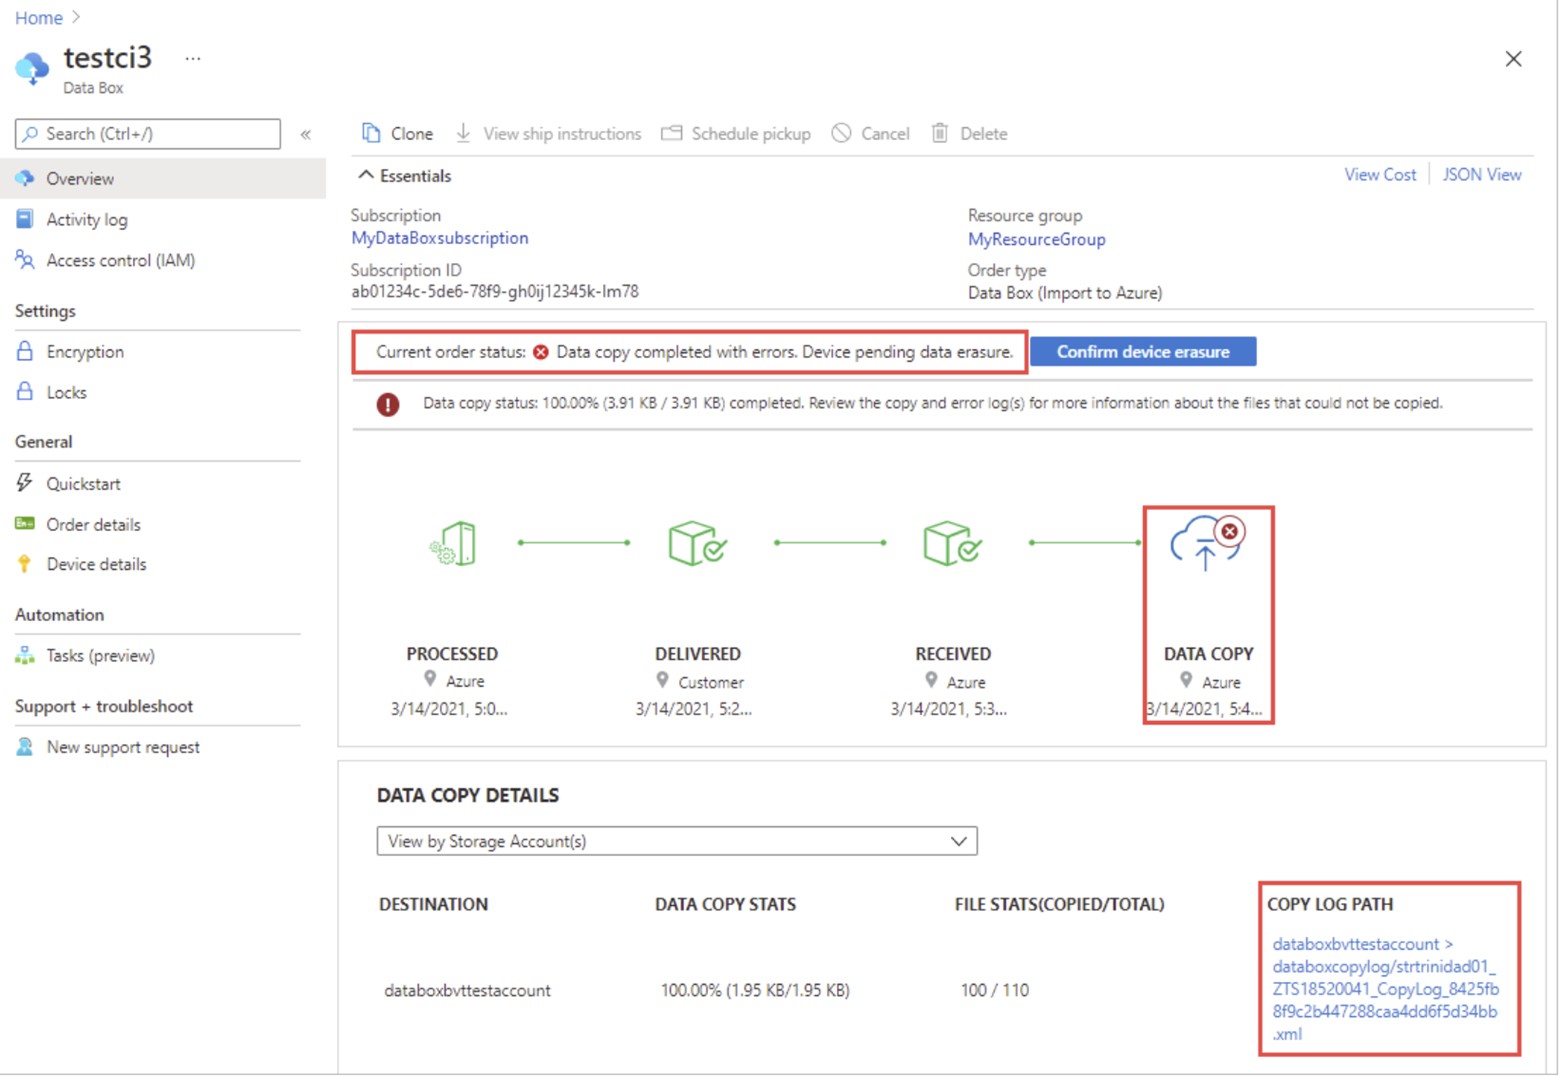
Data Validation
Once data is copied to respective destination, and if you’ve some files which were not copied. Check the order job and you’ll find the same.
Conclusion : I hope the above screenshots and tips help you during your databox order and copy process.
Happy Learning!
Subscribe to my biweekly newsletter for the latest posts and summaries. Your privacy is paramount, and your email stays with us securely. click the link to submit your email. https://forms.office.com/r/6ysKm4nkp4